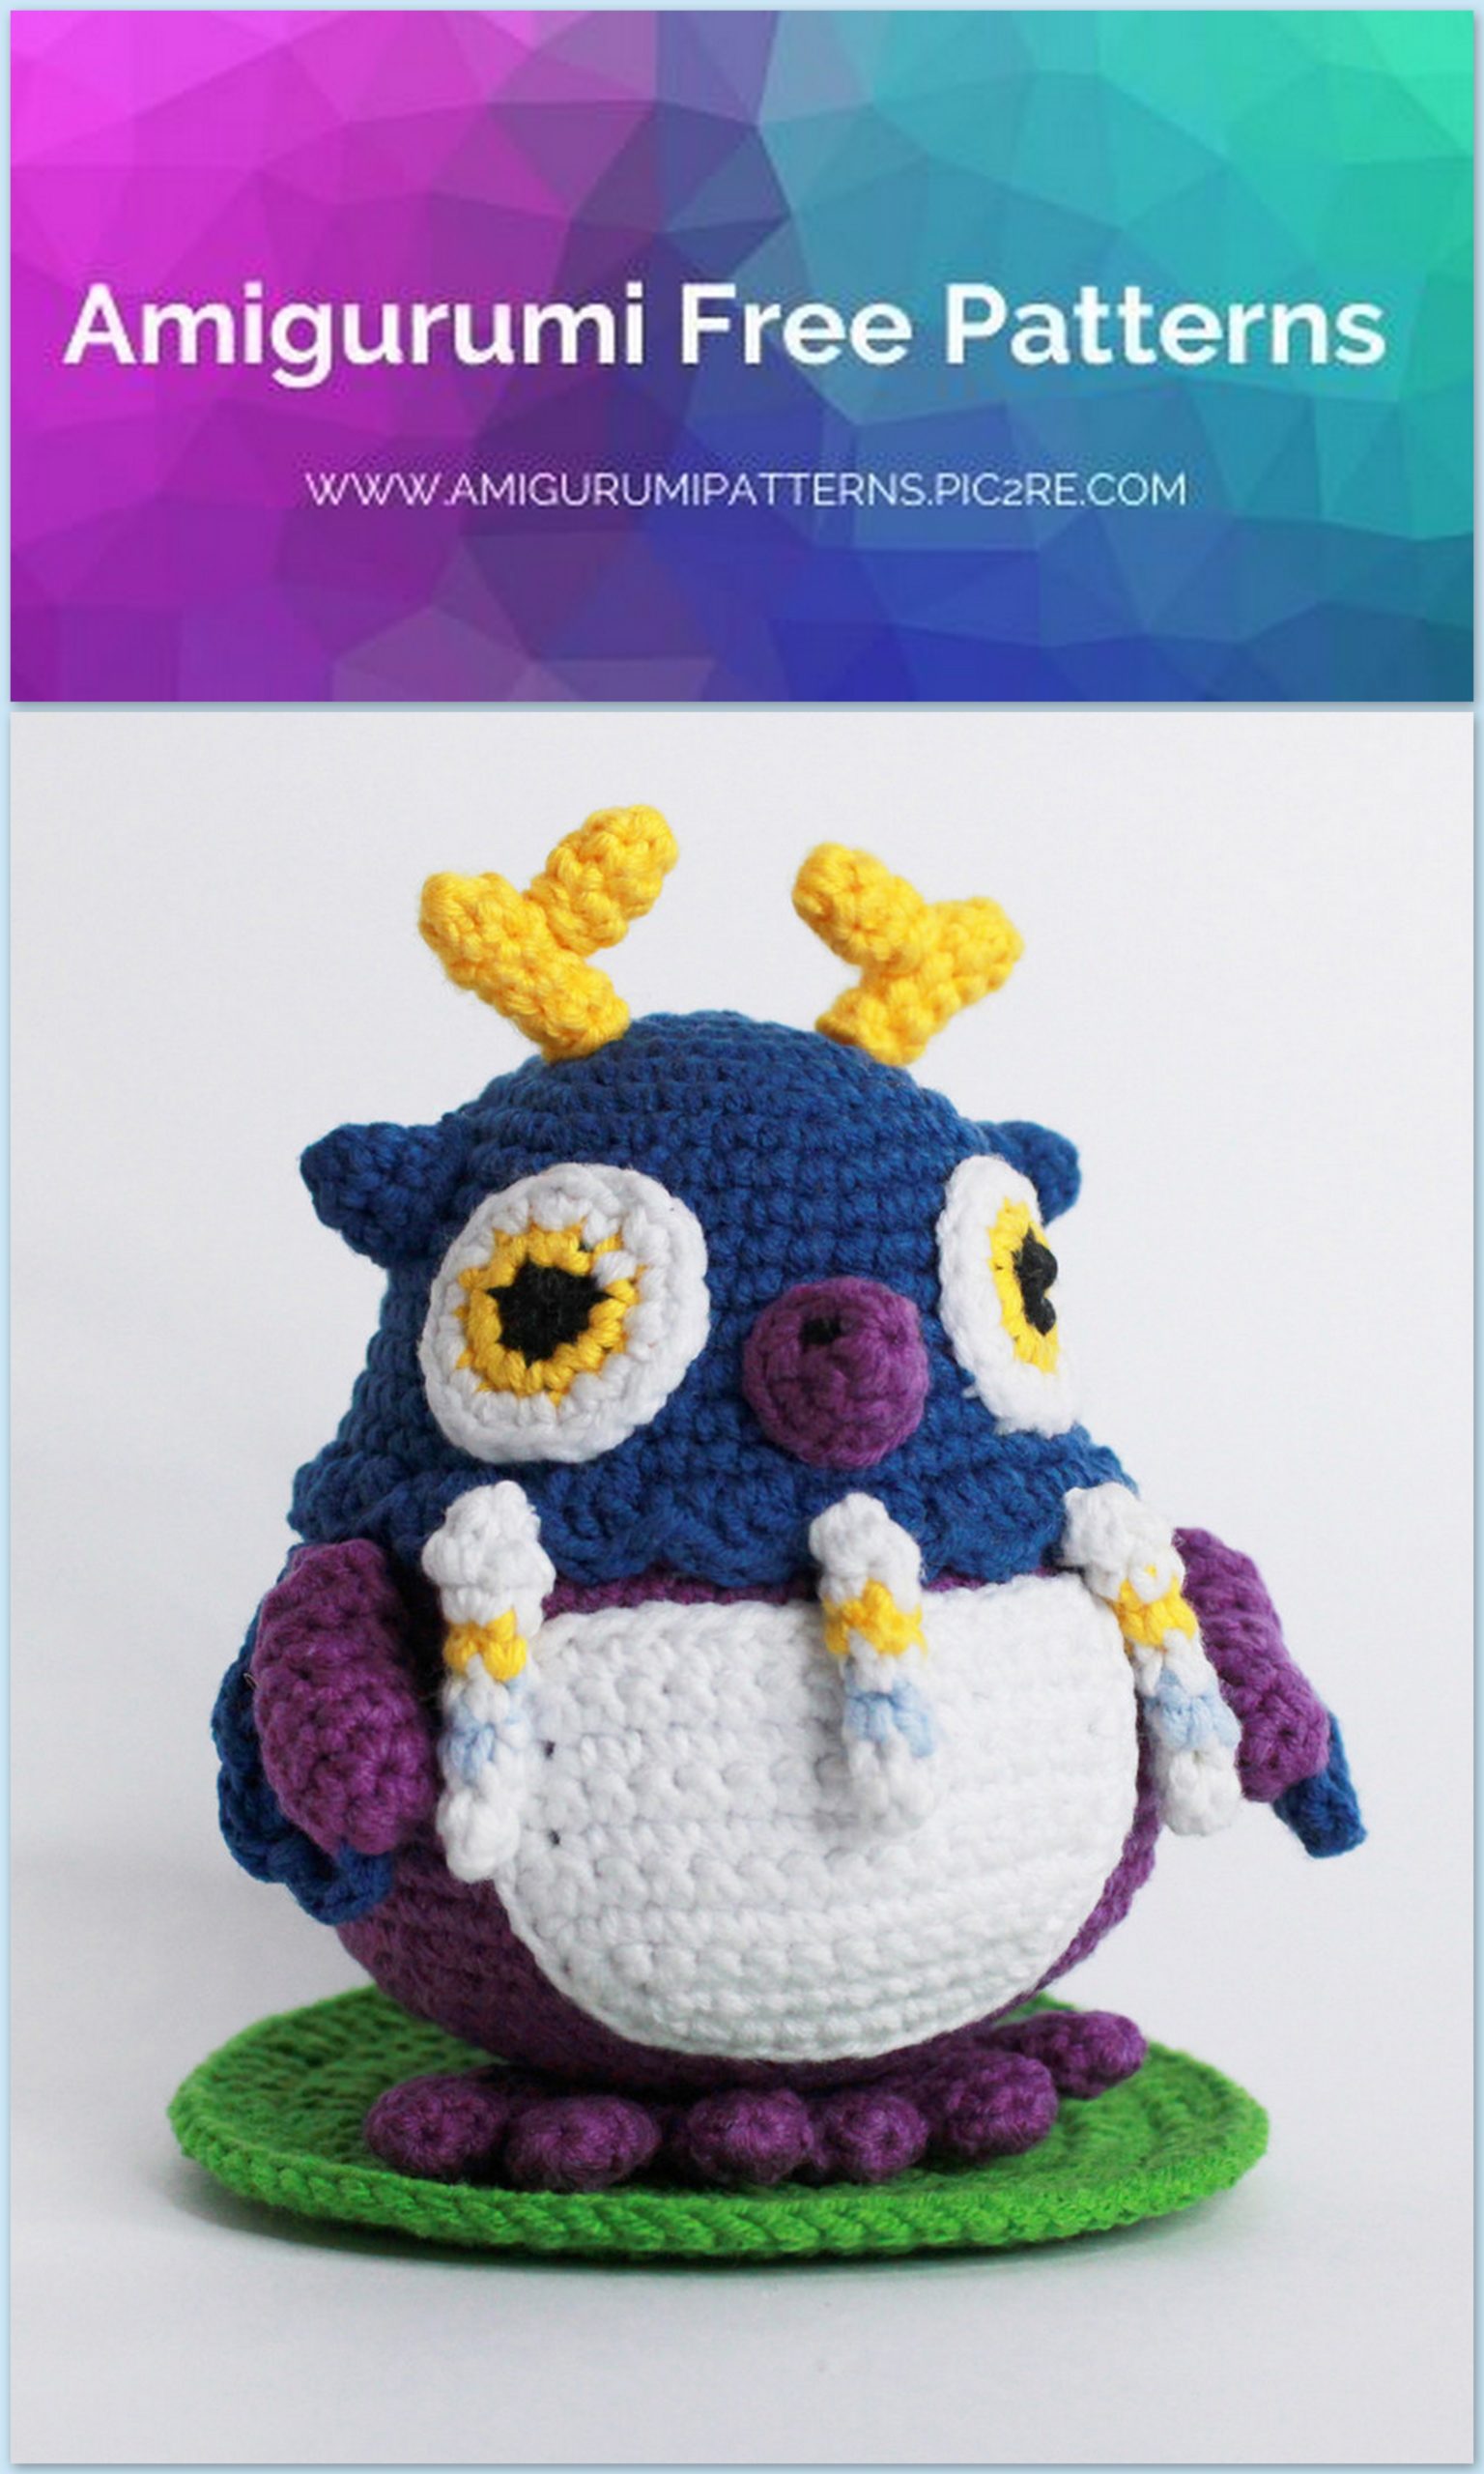
Amigurumi Blue Owl Free Crochet Pattern
Pinterest Offical Page : amigurumipatterns.pic2re.com
Facebook Group: amigurumipatterns.pic2re.com
Facebook Offical Page: amigurumipatterns.pic2re.com
We will tie the hero together
Knitting pattern:
Moonlight (Alliance)
The complexity of the scheme:
Terms of use
Pattern: (Tatiana Ganso Amigurumi / Tatyana Dorokhina),
1. Materials
2. yarn:
2.1. blue (COTTON GOLD Alize No. 279);
2.2. purple (YarnArt Jeans No. 50);
2.3. light blue (YarnArt Jeans No. 75);
2.4. yellow (YarnArt Jeans No. 35);
2.5. white (COTTON GOLD Alize No. 55);
2.6. black (COTTON GOLD Alize No. 60);
3. hook (No. 2-2.5);
4. filler (synthetic winterizer or holofiber);
5. needle and scissors.
2. Designations:
1. ch – air loop;
2. Sc – single crochet;
3. inc – increase;
4. dec – decrease;
5. Dc – double crochet;
6. sl-st – connecting column;
7. […] – the number of loops in a row;
8. (…) X N – in parentheses a group of loops, number n – how many times to knit
this group.
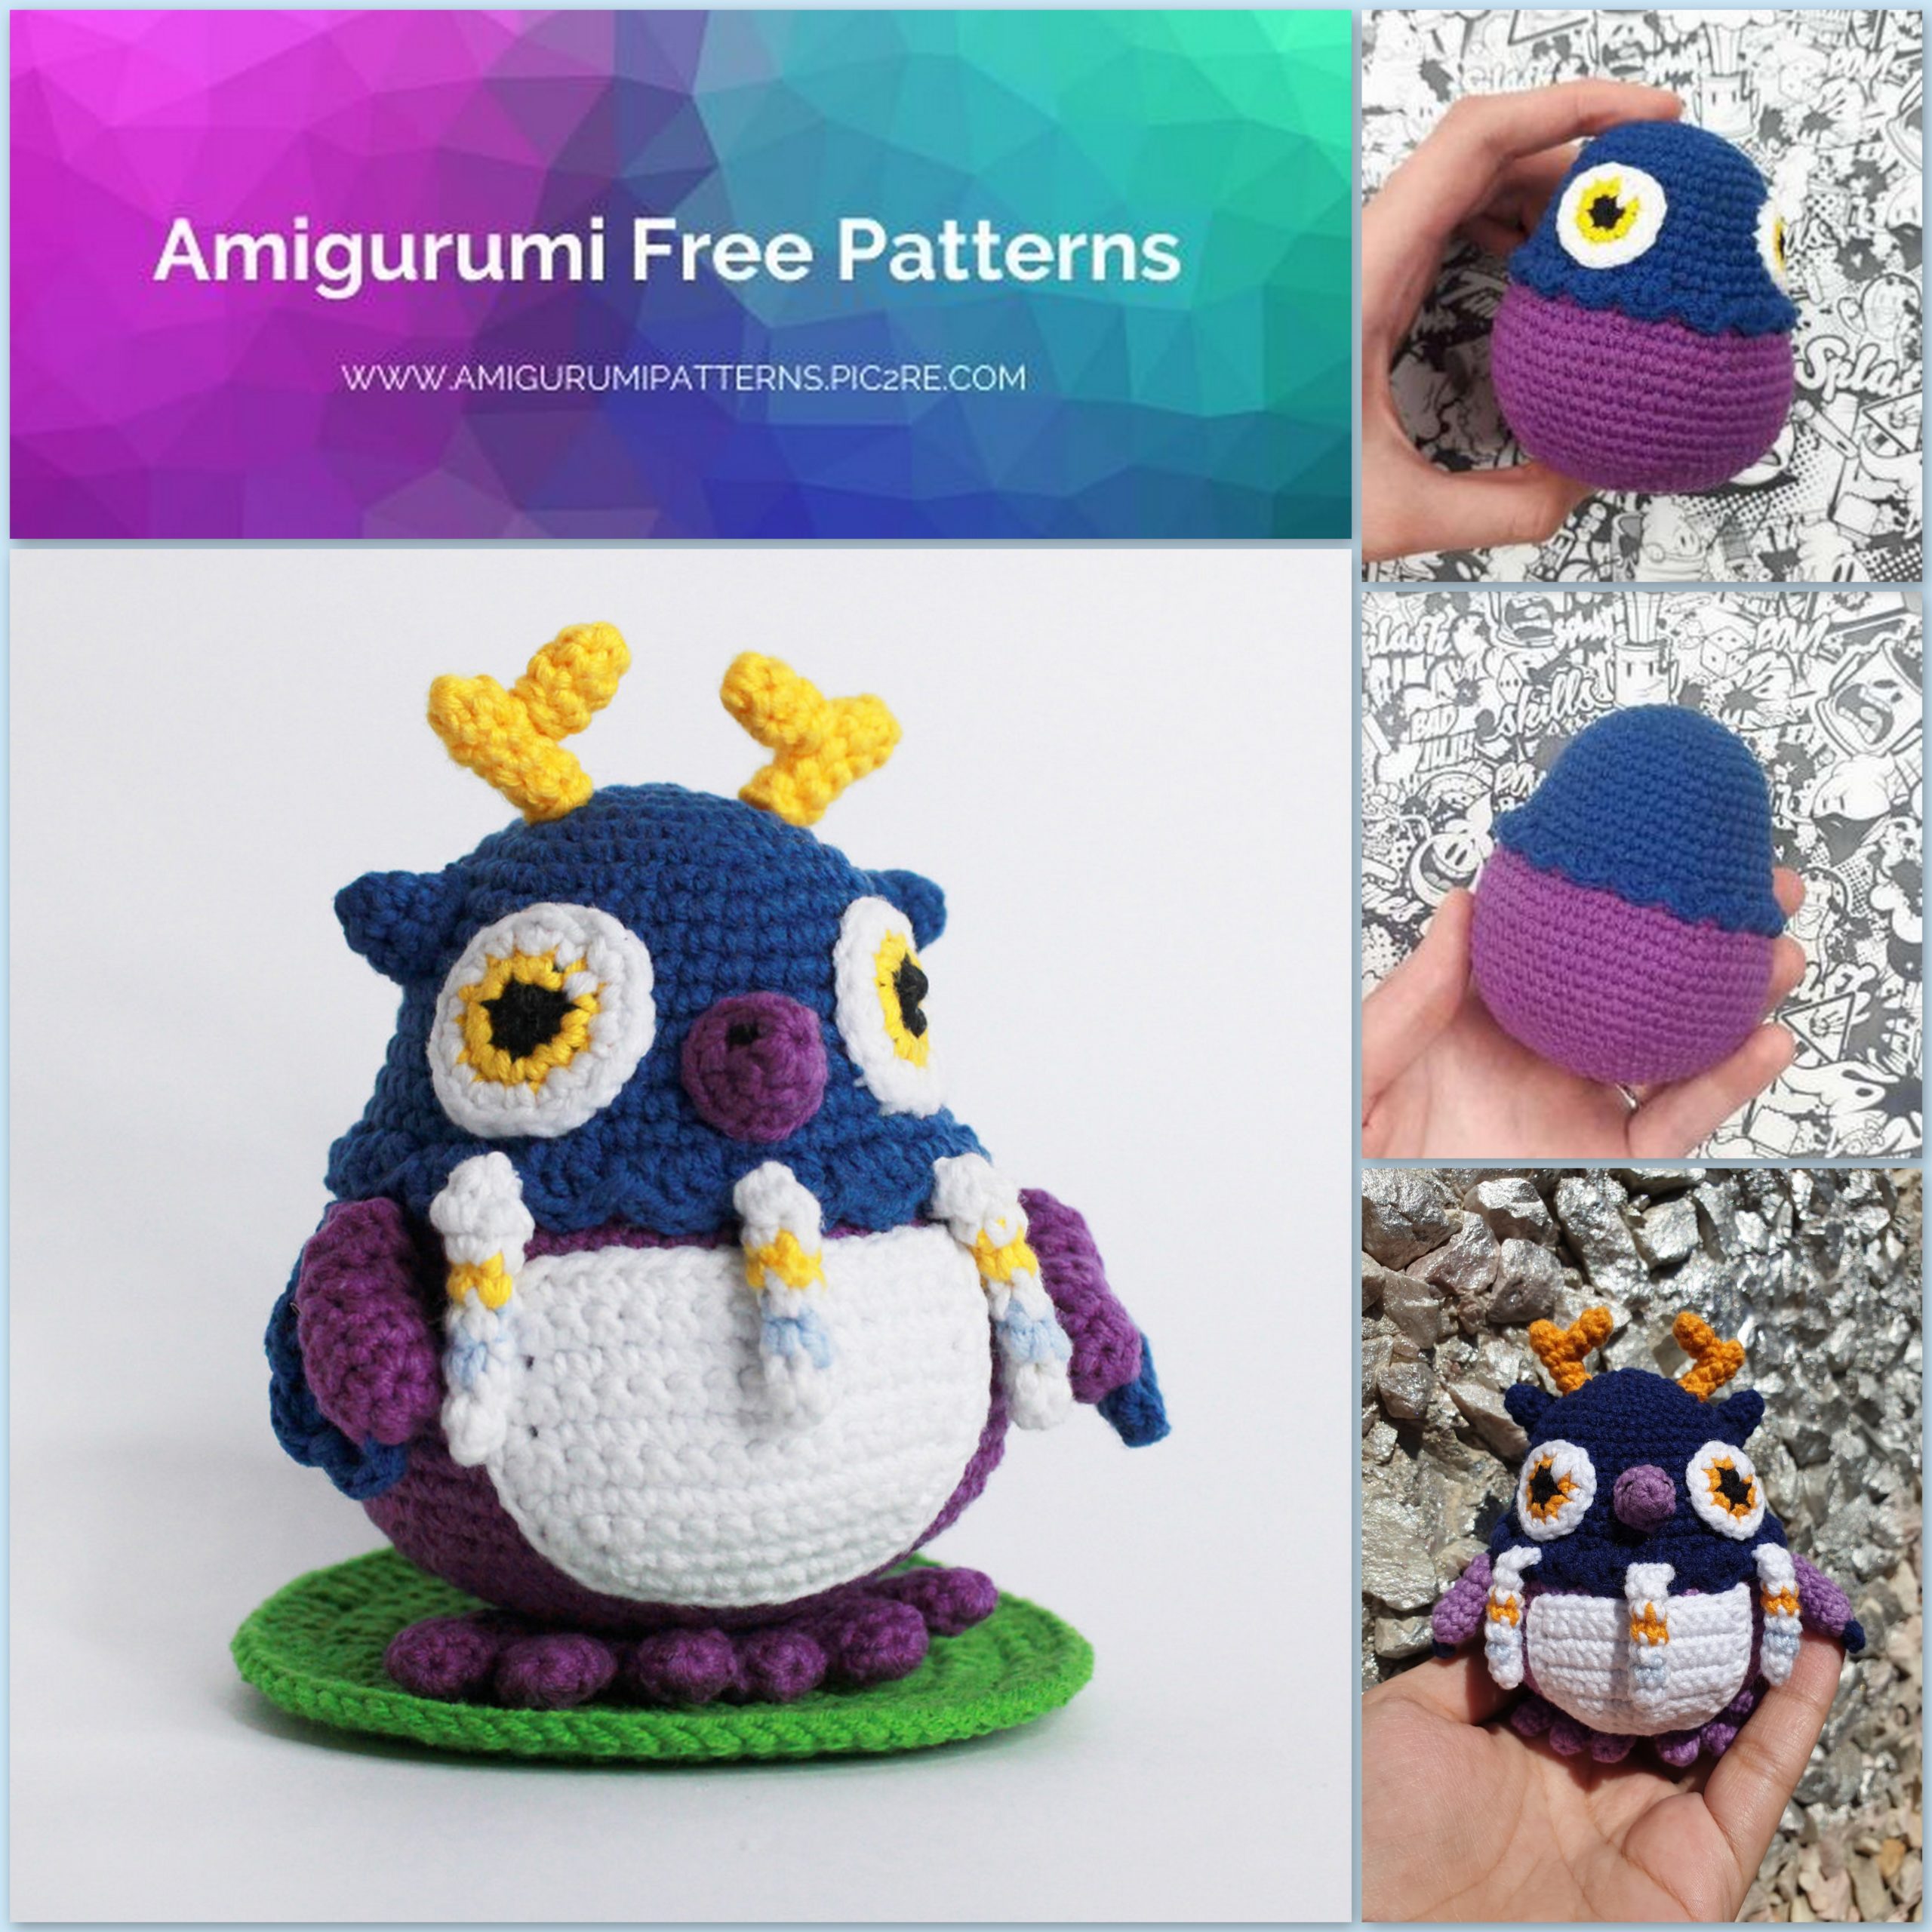
3. Torso:
Start knitting with blue yarn
1p: 6 Sc in the amigurumi ring [6];
2p: 6 inc [12];
3p: (1 Sc, inc) x6 [18];
4p: (2 Sc, inc) x6 [24];
5p: (3 Sc, inc) x6 [30];
6p: (4 Sc, inc) x6 [36];
7p: (5 Sc, inc) x6 [42];
Photo No. 1. The first seven rows
8-11r (4 rows): 42 Sc in a straight line [42];
12p: (6 Sc, inc) x6 [48];
13p: 48 Sc in a straight line [48];
14p: (7 Sc, inc) x6 [54];
15p: 54 Sc in a straight line [54];
16p: 54 Sc for the rear walls of the loops of the last row [54];
On the last column you need to change the blue yarn to purple
17p: (8 Sc, inc) x6 [60];
18p: 60 Sc in a straight line [60];
19p: (9 Sc, inc) x6 [66];
20-25r (6 rows): 66 Sc in a straight line [66];
26p: (9 Sc, dec) x6 [60];
27p: (8 Sc, dec) x6 [54];
28p: (7 Sc, dec) x6 [48];
29p: (6 Sc, dec) x6 [42];
From this moment we begin to gradually fill the part. Stuff tightly!
30p: (5 Sc, dec) x6 [36];
31p: (4 Sc, dec) x6 [30];
32p: (3 Sc, dec) x6 [24];
33p: (2 Sc, dec) x6 [18];
34p: (1 Sc, dec) x6 [12];
35p: 6 dec [6];
After the last row has been tied, we pull the thread and tighten the hole.
In order to tighten the hole, we introduce the needle into the front walls of the loops of the last row and tighten (Photo No. 8.9). Insert the needle into the middle of the ring and hide the thread in the part. Cut the thread.
4. Strapping (blue yarn):
We introduce the hook into the first loop of the 16th row of the head-body, knit 2 ch, then in the next loop we knit 2 Dc, and in the third loop 1 sl-st.
The following pattern should be obtained. Next 17 times in a row we knit a group of loops consisting of: 1 Dc, 2 Dc in one loop, 1 sl-st in the next loop (Photo No. 13.14). And in the end
we knit 1 sl-st in the first loop of the binding.
In order for the harness to fit snugly to the body, it can be additionally sewn.
5. Eyes
Start knitting with black yarn
1p: 6 Sc in the amigurumi ring [6];
Change the yarn to yellow and continue to knit
2p: 6 inc [12];
Change the yarn to white and continue to knit
3p: (1 Sc, inc) x6 [18];
At the end we knit 1 sl-st. Cut the thread, leave a long tip.
Sew on the eyes between the 8th and 15th rows of the head-trunk.
In place of the sl-st, which we knitted at the end, we embroider a highlight.
6. Beak
1p: 6 Sc in the amigurumi ring [6];
2p: 6 Sc in a straight line [6];
3p: 6 inc [12];
1 sl-st to the next loop. Cut the thread, leave a long tip.
Sew a beak between the 11th and 14th rows of the head. When sewing, we stuff the part!
After the beak has been sewn, we embroider nostrils on it with black yarn.
7. Horns
Knit yellow yarn
1 piece (2 pcs):
1p: 5 Sc in the amigurumi ring [5];
2-5r (4 rows): 5 Sc in a straight line [5];
Cut the thread, leave a long tip.
2 part (2 pcs):
1p: 5 Sc in the amigurumi ring [5];
2,3r (2 rows): 5 Sc in a straight line [5];
Cut the thread, leaving
Have a long tip.
Sew 2 part to 1 part in 3 rows. Sew the resulting horns on the 4th row of the head-body.
8. Ears
Knit blue yarn
1p: 6 Sc in the amigurumi ring [6];
2p: 6 Sc in a straight line [6];
3p: (1 Sc, inc) x3 [9];
Cut the thread, leave a long tip. Sew ears between 7 and 8 rows.
9. Hands
Part 1 (right hand):
Knit blue yarn
1p: dial 9 ch, turn the knitting and continue to knit from the third loop from the hook. We knit 2 hdc, 1 sl-st, 3 Dc, 1 sl-st, 3 hdc, 1 sl-st, 3 Sc [14];
Part 1 (left hand):
Knit blue yarn
1p: dial 8 ch, turn the knitting and continue to knit from the second loop from the hook. We knit 3 Sc, 1 sl-st, 3 hdc, 1 sl-st, 3 Sc, 1 sl-st, 3 hdc [15];
2 part (2 pcs):
1p: 6 Sc in the amigurumi ring [6];
2p: (1 Sc, inc) x3 [9];
3.4r (2 rows): 9 Sc in a straight line [9];
5p: 3 inc, 3 U [9];
6p: 2 Sc, inc, 1 Sc, inc, 1 Sc, dec, dec, which goes to the next row [9];
7p: (1 Sc, dec) x3 [6];
We tighten the hole. Cut the long thread. In order to sew a hand to the body, move the thread of the hand to the side. For the left hand, move the thread to the right, and for the right to the left.
Sew 1 part to 2 parts over the entire area.
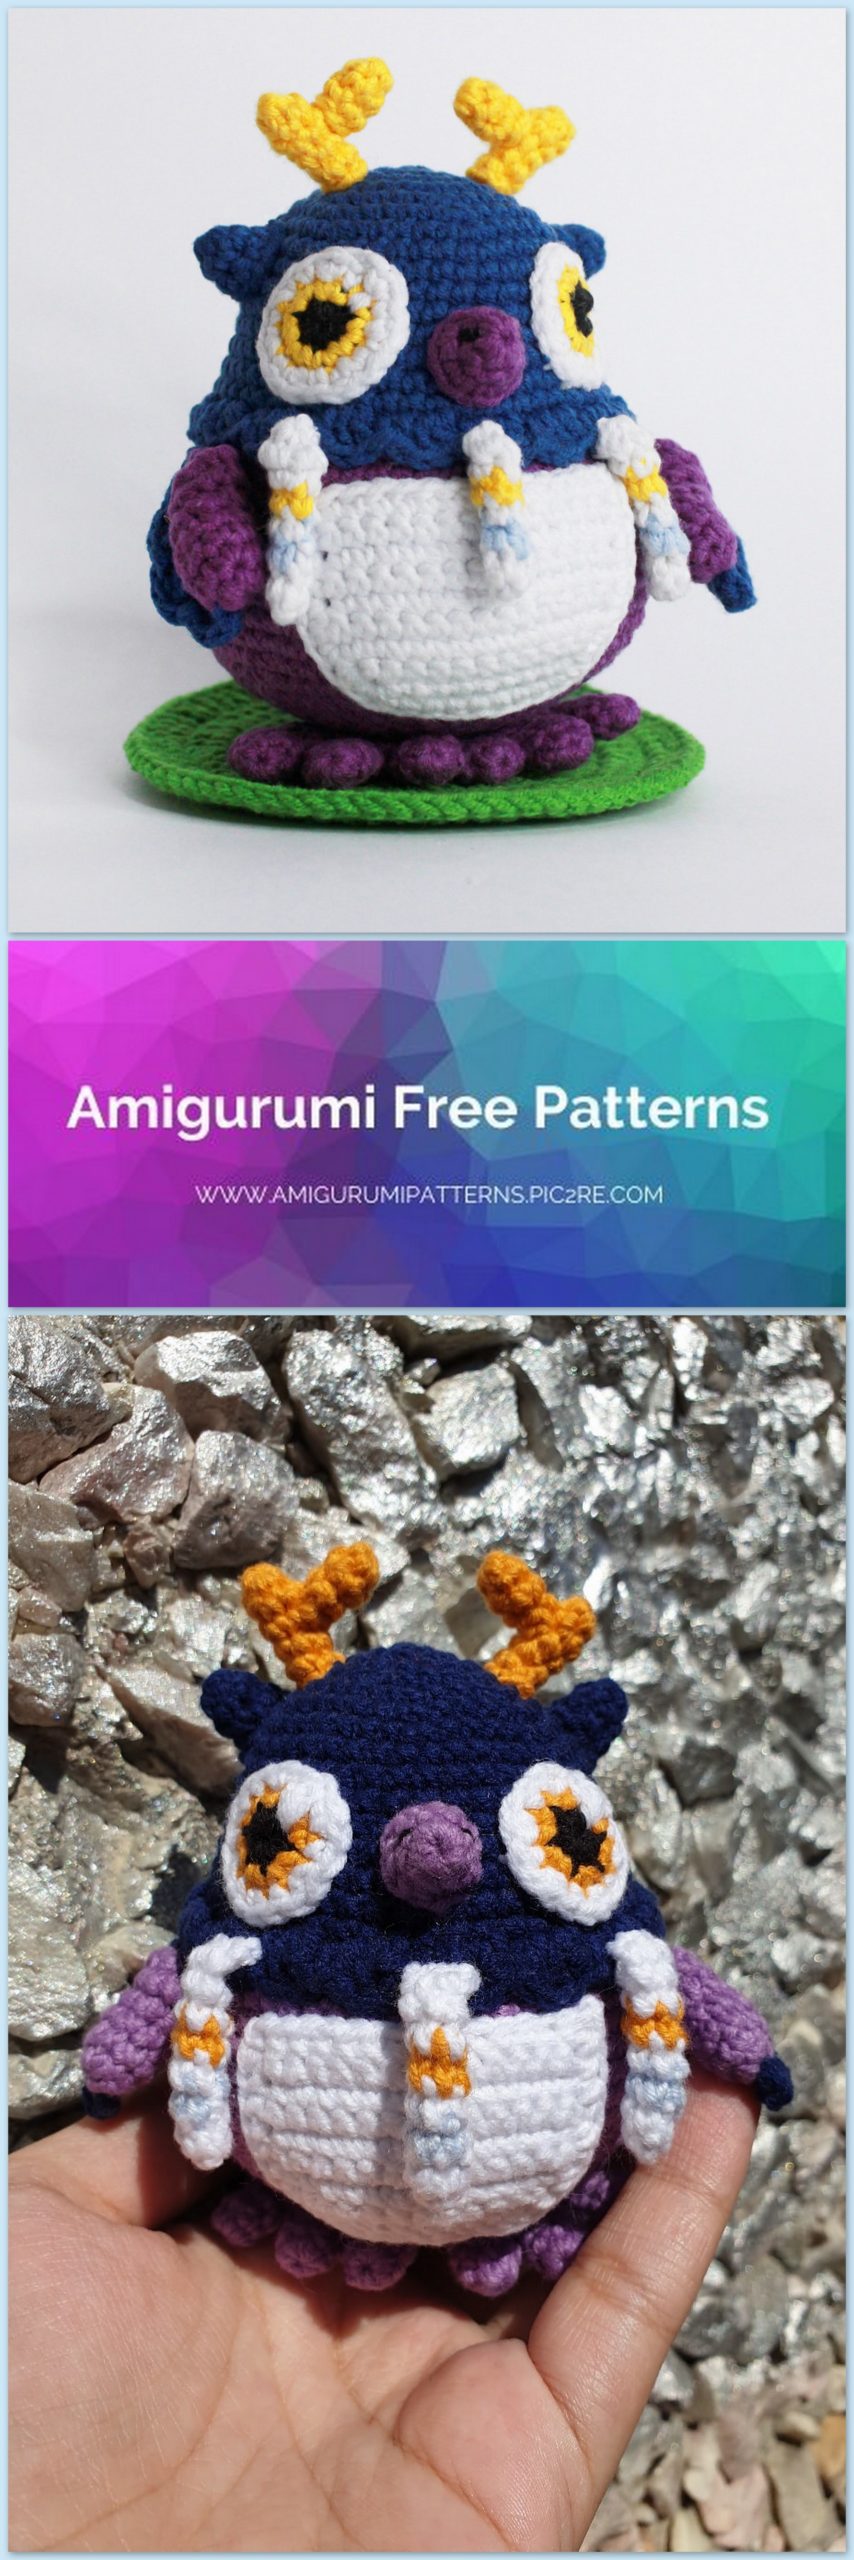
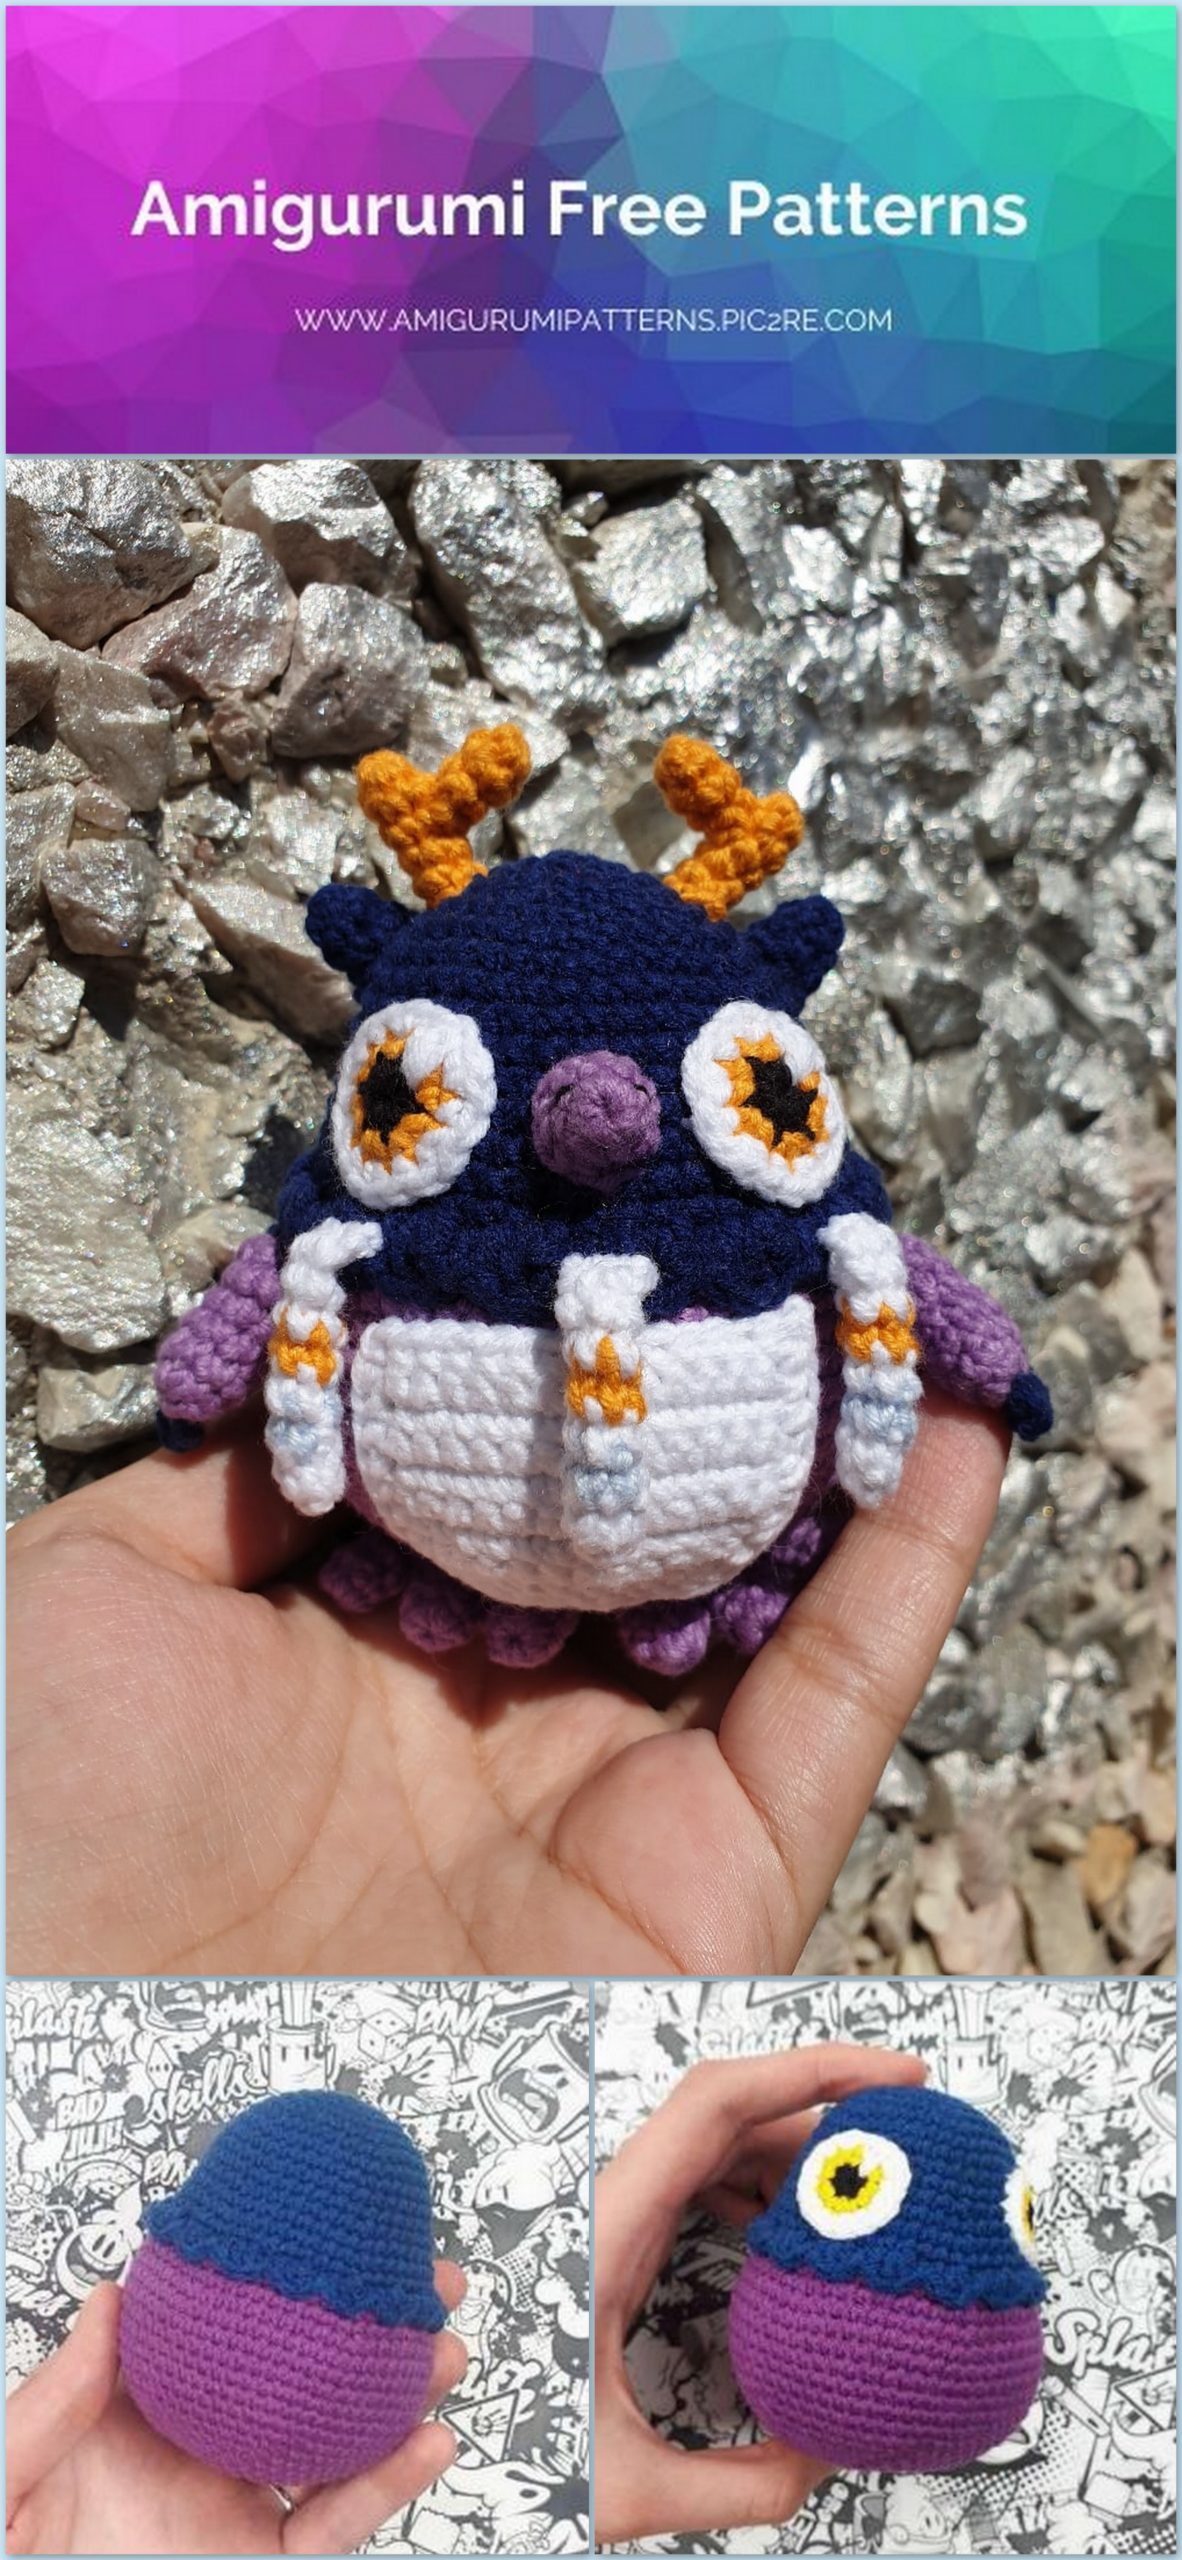
10. Belly
Knit white yarn
1p: dial 11 ch, turn the knitting and continue to knit from the second loop from the hook. We knit 10 Sc in the air chain [10];
Next, we knit in rotary rows and at the beginning of each row we knit 1 ch
2p: 1 ch, inc, 8 Sc, inc [12];
3p: 1 ch, inc, 10 Sc, inc [14];
4-9r (6 rows): 1 ch, 14 Sc in a straight line [14];
Next, we need to do the binding along the edge of the part. In order to make a binding, we knit Sc around the entire perimeter of the part.
Cut the thread, leave a long tip. Sew the stomach so that its upper part lies on the 18th row of the head-trunk.
11. “Tails” on the stomach
Start knitting with white yarn
1p: 4 Sc in the amigurumi ring [4];
2p: 4 Sc in a straight line [4];
Change the yarn to gray
3p: 4 Sc in a straight line [4];
Change the yarn to white
4p: 4 Sc in a straight line [4];
Change the yarn to yellow
5p: 4 Sc in a straight line [4];
Change the yarn to white
6p: (1 Sc, inc) x3 [6];
7p: 6 Sc straight [6];
Tighten the hole. Cut the thread, leave a long tip for sewing.
Remove the thread from the side of the part again and sew it on the 17th row of the head-body
12. Tail
Purple yarn
1p: 4 Sc in the amigurumi ring [4];
2p: 4 Sc in a straight line [4];
3p: (1 Sc, inc) x2 [6];
Fold the part in half and knit Sc to the end through both walls of the part (Photo No. 24). Cut the thread, leave a long tip for sewing. Sew on 21
row of torso heads.
13. Feet
Finger (3 pcs):
1p: 6 Sc in the amigurumi ring [6];
2,3р: 6 Sc in a straight line [6];
On the first two fingers, cut the thread, but on the third we continue to knit!
4p: on this row we will connect the fingers together. Holding the third finger on the hook, enter the hook into any column of the last row of the second finger and knit 3 Sc on it, then enter the hook in the first pale and knit 6 Sc on it, again go to the second finger and knit 3 Sc, and again go to the third finger in order to knit on it the last 6 Sc rows [18];
5p: 18 Sc in a straight line [18];
6p: (4 Sc, dec) x3 [15];
7p: (3 Sc, dec) x3 [12];
8p: (2 Sc, dec) x3 [9];
9p: (1 Sc, dec) x3 [6];
Tighten the hole. Cut the thread, leave a long tip. We display the thread as shown in the photo (Photo No. 28). Sew on the bottom of the torso-head.
Hooray! You did it!