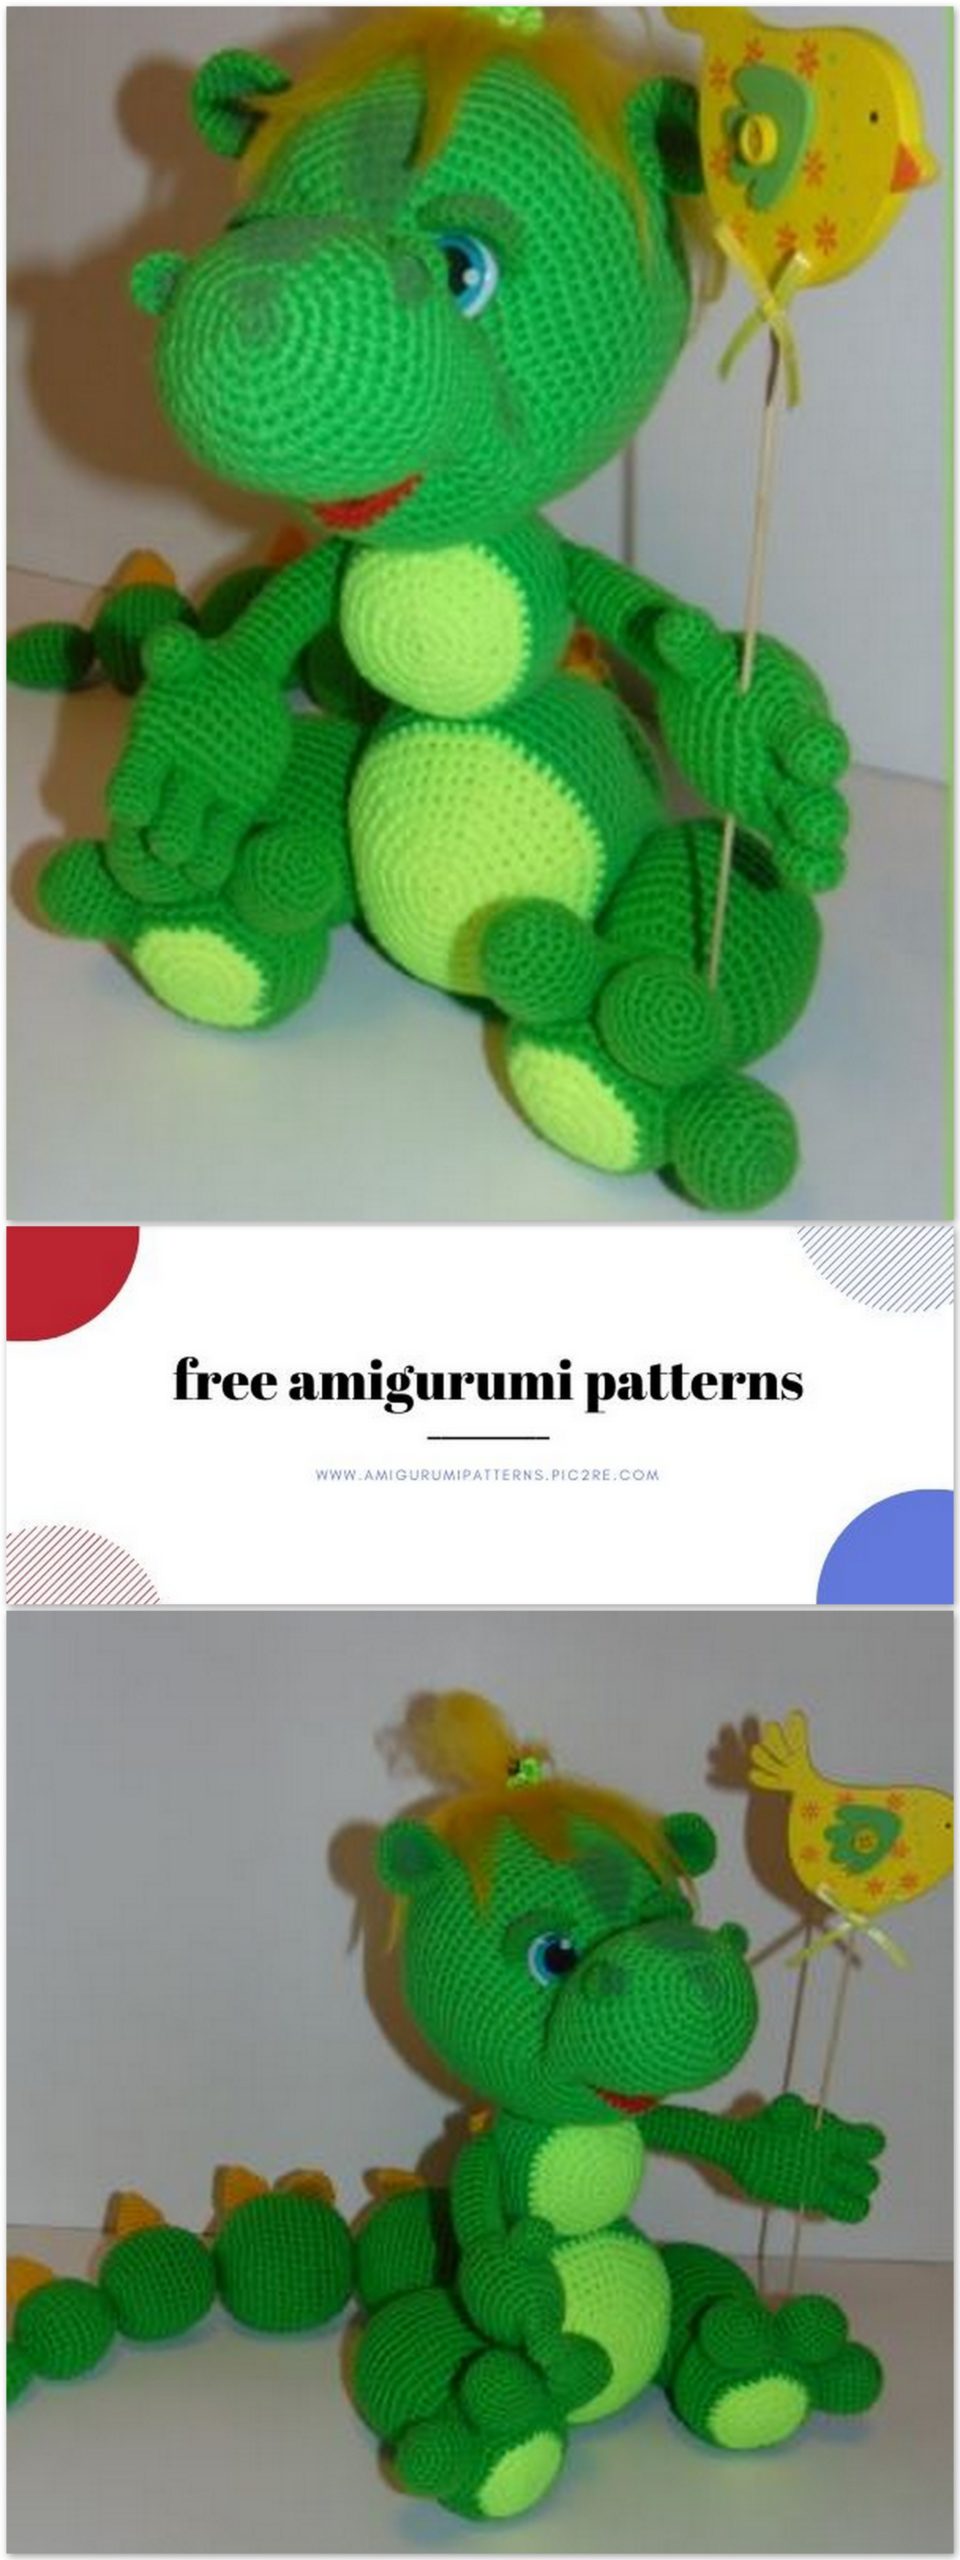
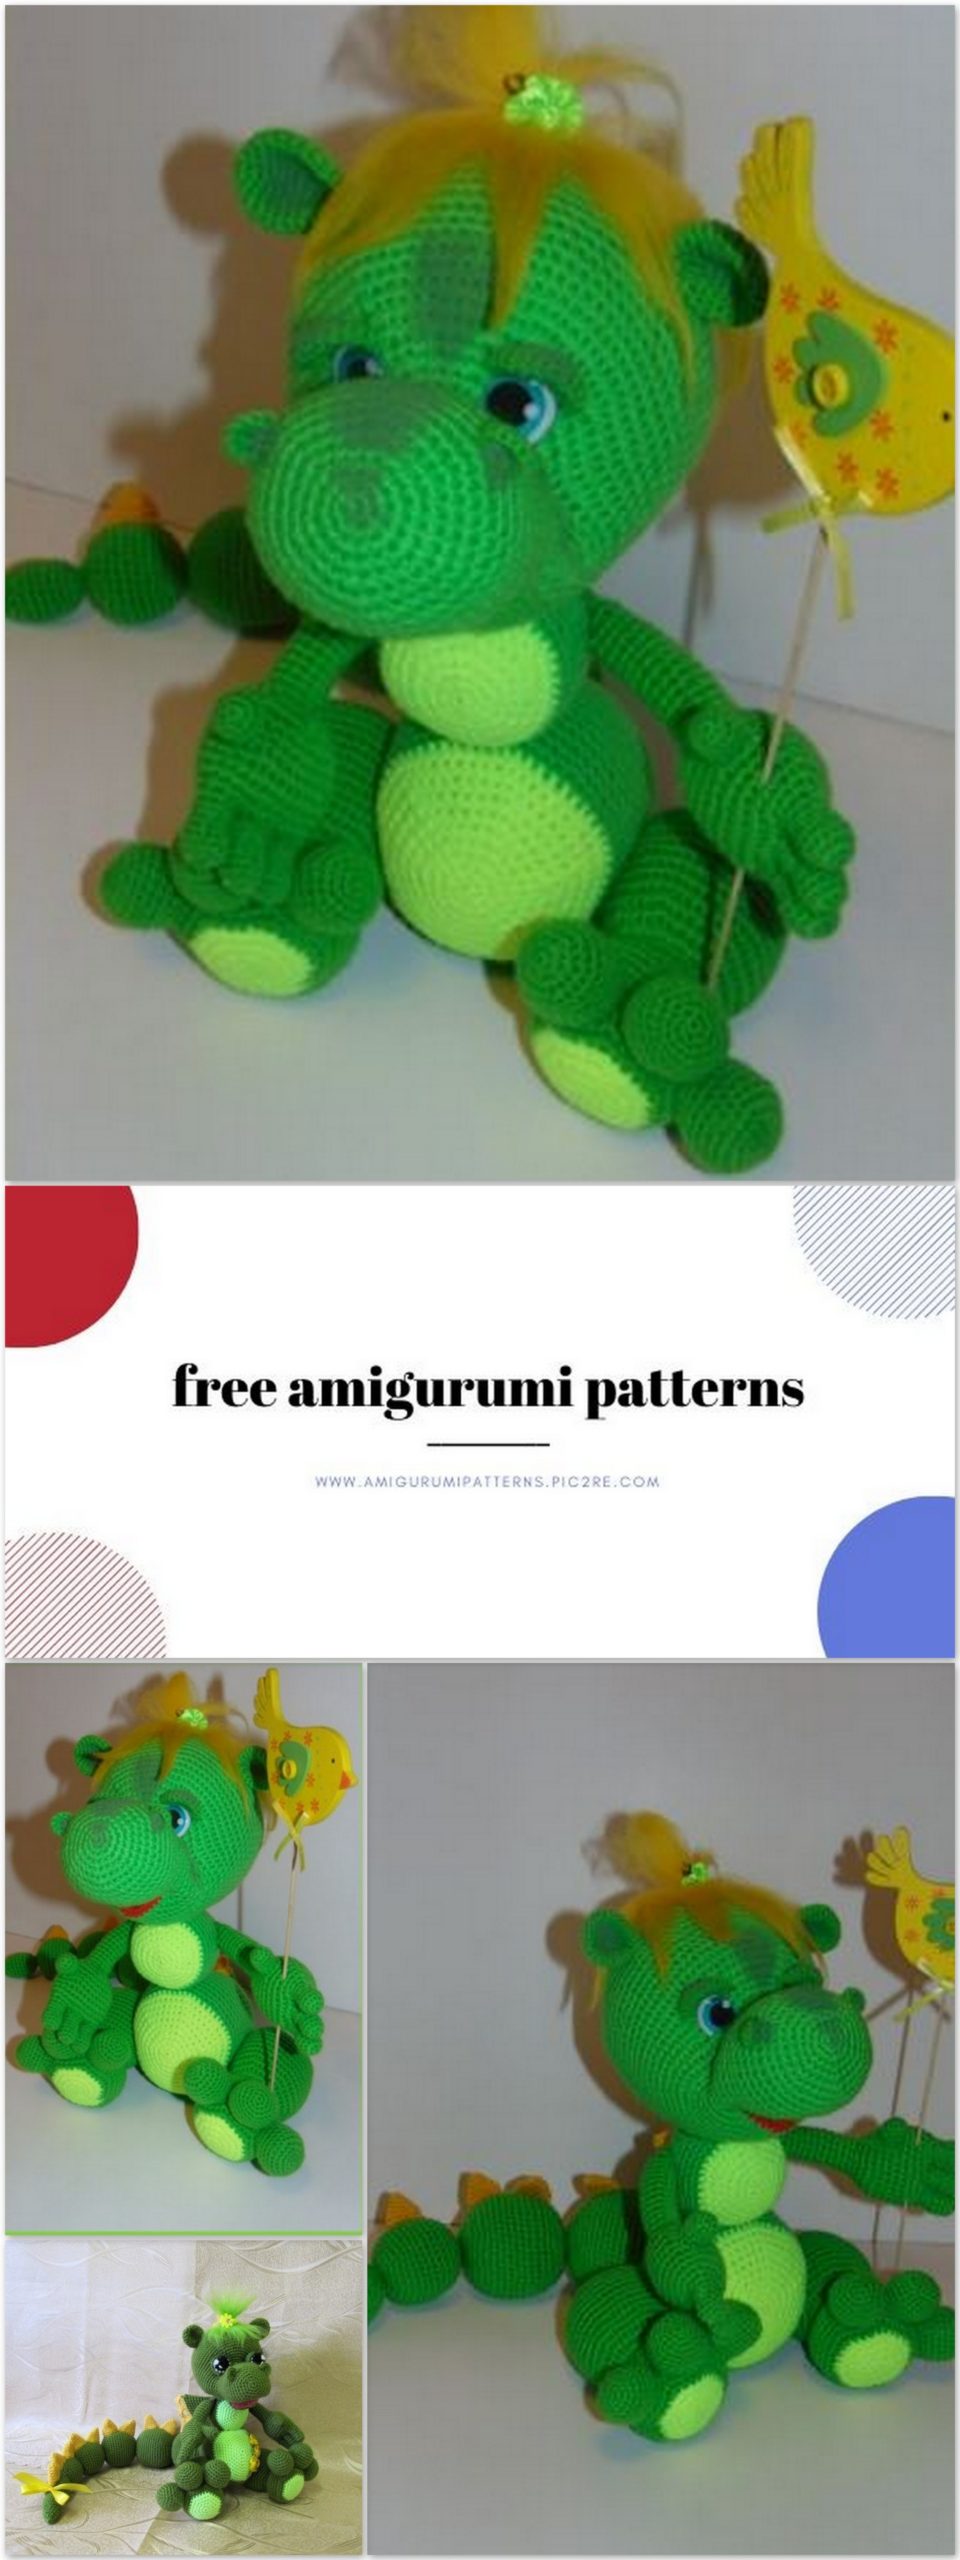
Amigurumi Dragon Free Crochet Pattern
Pinterest Offical Page : amigurumipatterns.pic2re.com
Facebook Group: amigurumipatterns.pic2re.com
Facebook Offical Page: amigurumipatterns.pic2re.com
We share amigurumi free dragon pattern for you. You can browse our website for new amigurumi patterns.
Knitted from Bambino NAKO yarn (75% acrylic, 25% wool) 130 m / 50 g, crocheted No. 3.
You will need:
• the main color yarn (mine is green) for the body is about 200 g and the remains of multi-colored yarn for decoration (mine is yellow and St. green),
• suitable hook,
• filler (synthetic winterizer or holofiber),
• glue,
• a stitching needle with a large eye,
• 14 buttons of different diameters (from 2 cm to 1 cm).
Applicable abbreviations:
ch. – air loop
sc – single crochet
hdc – half crochet
dc – double crochet
ss4n – a column with four crochets
sl-st – connecting column
STEP No. 1. BODY
Upper ball: We knit yarn St. Green colour. We cram in the knitting process, at the stage at which you are most comfortable.
1 row: 6 sc into magic ring
2 row: 6 inc (12)
3 row: (sc, inc) – 6 times (18)
4 row: (2 sc, inc) – 6 times (24)
5 row: (3 sc, inc) – 6 times (30)
6 row: (4 sc, inc) – 6 times (36)
7 row: (5 sc, inc) – 6 times (42)
Go to the green thread.
8 – 16 row: 42 sc
17 row: (5 sc, dec) – 6 times (36)
18 row: (4 sc, dec) – 6 times (30)
19 row: (3 sc, dec) – 6 times (24)
20 row: (2 sc, dec) – 6 times (18)
21 row: (1 sc, dec) – 6 times (12)
22 row: tighten
Bottom ball:
We knit st. Green colour. We cram in the knitting process, at the stage at which you are most comfortable.
1 row: 6 sc into magic ring
2 row: 6 inc (12)
3 row: (sc, inc) – 6 times (18)
4 row: (2 sc, inc) – 6 times (24)
5 row: (3 sc, inc) – 6 times (30)
6 row: (4 sc, inc) – 6 times (36)
7 row: (5 sc, inc) – 6 times (42)
8 row: (6 sc, inc) – 6 times (48)
9 row: (7 sc, inc) – 6 times (54)
10 row: (8 sc, inc) – 6 times (60)
Go to the green thread.
11-22 row: 60 sc
23 row: (8 sc, dec) – 6 times (54)
24 row: (7 sc, dec) – 6 times (48)
25 row: (6 sc, dec) – 6 times (42)
26 row: (5 sc, dec) – 6 times (36)
27 row: (4 sc, dec) – 6 times (30)
28 row: (3 sc, dec) – 6 times (24)
39 row: (2 sc, dec) – 6 times (18)
30 row: (1 sc, dec) – 6 times (12)
Insert the button with the tail – button fastening, then we will attach the tail to it
31 row: tighten
Sew top and bottom

STEP No. 2. TAIL
Each ball is knitted separately and attached to the previous button fastening. (but you can just sew on)
Knit with green yarn. We cram in the knitting process, at the stage at which you are most comfortable.
1 ball:
1 row: 6 sc into magic ring
2 row: 6 inc (12)
3 row: (sc, inc) – 6 times (18)
4 row: (2 sc, inc) – 6 times (24)
5 row: (3 sc, inc) – 6 times (30)
6 row: (4 sc, inc) – 6 times (36)
7 row: (5 sc, inc) – 6 times (42)
8 row: (6 sc, inc) – 6 times (48)
9 row: (7 sc, inc) – 6 times (54)
Making button fastening (see photo)
10 – 20 row: 54 sc
21 row: (7 sc, dec) – 6 times (48)
22 row: (6 sc, dec) – 6 times (42)
23 row: (5 sc, dec) – 6 times (36)
24 row: (4 sc, dec) – 6 times (30)
25 row: (3 sc, dec) – 6 times (24)
26 row: (2 sc, dec) – 6 times (18)
27 row: (1 sc, dec) – 6 times (12)
28 row: tighten
2 ball.
1 row: 6 sc into magic ring
2 row: 6 inc (12)
3 row: (sc, inc) – 6 times (18)
4 row: (2 sc, inc) – 6 times (24)
5 row: (3 sc, inc) – 6 times (30)
6 row: (4 sc, inc) – 6 times (36)
7 row: (5 sc, inc) – 6 times (42)
8 row: (6 sc, inc) – 6 times (48)
Making button fastening (see photo)
9-18 row: 48 sc
19 row: (6 sc, dec) – 6 times (42)
20 row: (5 sc, dec) – 6 times (36)
21 row: (4 sc, dec) – 6 times (30)
22 row: (3 sc, dec) – 6 times (24)
23 row: (2 sc, dec) – 6 times (18)
24 row: (1 sc, dec) – 6 times (12)
25 row: tighten
3 ball:
1 row: 6 sc into magic ring
2 row: 6 inc (12)
3 row: (sc, inc) – 6 times (18)
4 row: (2 sc, inc) – 6 times (24)
5 row: (3 sc, inc) – 6 times (30)
6 row: (4 sc, inc) – 6 times (36)
7 row: (5 sc, inc) – 6 times (42)
Making button fastening (see photo)
8 – 16 row: 42 sc
17 row: (5 sc, dec) – 6 times (36)
18 row: (4 sc, dec) – 6 times (30)
19 row: (3 sc, dec) – 6 times (24)
20 row: (2 sc, dec) – 6 times (18)
21 row: (1 sc, dec) – 6 times (12)
22 row: tighten
4 ball:
1 row: 6 sc into magic ring
2 row: 6 inc (12)
3 row: (sc, inc) – 6 times (18)
4 row: (2 sc, inc) – 6 times (24)
5 row: (3 sc, inc) – 6 times (30)
6 row: (4 sc, inc) – 6 times (36)
Making button fastening (see photo)
7-14 row: 36 sc
15 row: (4 sc, dec) – 6 times (30)
16 row: (3 sc, dec) – 6 times (24)
17 row: (2 sc, dec) – 6 times (18)
18 row: (1 sc, dec) – 6 times (12)
19 row: tighten
5 ball:
1 row: 6 sc into magic ring
2 row: 6 inc (12)
3 row: (sc, inc) – 6 times (18)
4 row: (2 sc, inc) – 6 times (24)
5 row: (3 sc, inc) – 6 times (30)
Making button fastening (see photo)
6 – 12 row: 30 sc
13 row: (3 sc, dec) – 6 times (24)
14 row: (2 sc, dec) – 6 times (18)
15 row: (1 sc, dec) – 6 times (12)
16 row: tighten
6 ball:
1 row: 6 sc into magic ring
2 row: 6 inc (12)
3 row: (sc, inc) – 6 times (18)
4 row: (2 sc, inc) – 6 times (24)
Making button fastening (see photo)
5-10 row: 30 sc
11 row: (2 sc, dec) – 6 times (18)
12 row: (1 sc, dec) – 6 times (12)
13 row: tighten
Tip:
1 row: 6 sc into magic ring
2 row: 6 inc (12)
3 row: (sc, inc) – 6 times (18)
4 – 8 row: 1 8 sc
Making button fastening
9 row: (1 sc, dec) – 6 times (12)
10 – 11 row: 12 sc
12 row: dec – 6 times (6)
13 row: tighten
STEP No. 3. LEGS
Fingers – 6 pcs.
Knit with green yarn
1 row: 6 sc into magic ring
2 row: 6 inc (12)
3 row: (sc, inc) – 6 times (18)
4 row: (2 sc, inc) – 6 times (24)
5 – 9 row: 24 sc
10 row: (2 sc, dec) – 6 times (18)
11 row: (1 sc, dec) – 6 times (12)
The main part of the leg:
We knit st. green yarn
1 row: 6 sc into magic ring
2 row: 6 inc (12)
3 row: (sc, inc) – 6 times (18)
4 row: (2 sc, inc) – 6 times (24)
5 row: (3 sc, inc) – 6 times (30)
We turn to green yarn
6 row: (4 sc, inc) – 6 times (36)
7 row: (5 sc, inc) – 6 times (42)
8 row: we knit the back wall of the loop – 8 sc, attach the first finger of 6 sc (grab the loops and legs and fingers), followed by the second finger of 6 sc and the third finger of 6 sc, 16 sc (42)
9 row: 8 sc, 6 sc on the first finger, 6 sc on the second and 6 sc on the third, 16 sc (42)
10 – 12 row: 42 sc
13 row: (5 sc, dec) – 6 times (36)
14 row: (4 sc, dec) – 6 times (30)
15 row: (3 sc, dec) – 6 times (24)
16 row: (2 sc, dec) – 6 times (18)
17 row: 18 sc
18 row: inc 18 times (36)
19 row: (5 sc, inc) – 6 times (42)
20 row: (6 sc, inc) – 6 times (48)
21 – 28 row: 48 sc
29 row: (6 sc, dec) – 6 times (42)
30 row: (5 sc, dec) – 6 times (36)
31 row: (4 sc, dec) – 6 times (30)
32 row: (3 sc, dec) – 6 times (24)
33 row: (2 sc, dec) – 6 times (18)
34 row: (1 sc, dec) – 6 times (12)
35 row: tighten
Similarly, we knit the second leg.
STEP No. 4. HANDS 2 pcs
I recommend knitting the thumbs first, then the three main fingers and without tearing the threads from the third, start assembling
Thumb – 2 pcs.
Fingers – 6 pcs.
Knit with green yarn
1 row: 4 sc of the first finger, 4 sc of the second 8 sc of the third finger, 4 sc of the second and 4 sc of the first (24)
2 – 6 row: 8 sc
Assembly:
1 row: sc of the first finger, 4 sc of the second 8 sc of the third finger, 4 sc of the second and 4 sc of the first (24)
2 row: (3 sc, inc) – 6 times (30)
3-5 rows: 30 sc
6 row: For the Left hand: 16 sc, 4 sc attach the thumb, 10 sc (30)
For the right hand: 12 sc, 4 sc attach the thumb, 14 (30)
7 row: 16 sc, 4 sc on the thumb, 10 sc (30)
8 row: 30 sc
9 row: (3 sc, dec) – 6 times (24)
10 row: (2 sc, dec) – 6 times (18)
11 row: (1 sc, dec) – 6 times (12)
12 – 21 row: 12 sc
Leave the thread for sewing, fold the hand in half and sew. We fill the hand in the process, I have a tight fist and a soft handle.
STEP No. 5. HEAD
Knit with green yarn. The head fits in a spiral without a seam.
1 row: 6 sc into magic ring
2 row: 6 inc (12)
3 row: (sc, inc) – 6 times (18)
4 row: (2 sc, inc) – 6 times (24)
5 row: (3 sc, inc) – 6 times (30)
6 row: (4 sc, inc) – 6 times (36)
7 row: (5 sc, inc) – 6 times (42)
8 – 16 row: 42 sc
17 row: 16 sc, 15 ch., Skip 10 p sc in the 11th loop, 15 sc (47)
18 row: 47 sc
19 row: 4 increases, 4 decreases, 4 increases, 8 decreases, 4 increases, 4 decreases, 3 increases (46)
20 row: 46 sc
21 row: 4 increases, 4 decreases, 4 increases, 15 sc, 4 increases, 4 decreases, 3 increases (53)
22 row: 53 sc
23 row: 1 sc, 4 increments, 4 decreases, 5 inc, 19 sc, 5 inc, 4 decreases, 3 increases, 1 sc shift the marker by 1 loop
24 row: 62 sc
25 row: (2 sc, inc) – 6 times, 26 sc, (2 sc, inc) – 6 times (74)
26 row: 74 sc
27 row: (2 sc, inc) – 4 times, 20 sc, (dec, 3 sc) – 4 times, 15 sc, (inc, 2 sc) – 4 times (78)
28 – 42 row: 78 sc
At this stage, you need to tie a little dragon’s mouth, take pink (or red) yarn and start knitting 10 sc along the edge of the nose, then follow the pattern.
Sew the mouth to the chin.
So that the dragon’s nose was flat below, we cut out a piece of plastic from the plastic (I had a cover from a mayonnaise bucket) of this shape:
We insert into the head and glue it with glue, for reliability.
We stuff our nose and a little head.
Now we tie the head, stuffing in the process more tightly.
43 row: (11 sc, dec) – 6 times (72)
44 row: (10 sc, dec) – 6 times (66)
45 row: (9 sc, dec) – 6 times (60)
46 row: (8 sc, dec) – 6 times (54)
47 row: (7 sc, dec) – 6 times (48)
48 row: (6 sc, dec) – 6 times (42)
49 row: (5 sc, dec) – 6 times (36)
50 row: (4 sc, dec) – 6 times (30)
51 row: (3 sc, dec) – 6 times (24)
52 row: (2 sc, dec) – 6 times (18)
53 row: (1 sc, dec) – 6 times (12)
54 row: tighten
Now we will make a weight:
We stick the needle from below in places marked with pins, pull it out in the place of future eye sockets, stick through a row and poke below near so that 2 tails of a thread are not in one hole, but through a loop or through a row, we pull and tie to a knot, it will drown in a tightening of it it will not be visible, we hide the ponytails, we also do it with the second eye socket, we get a curl for the eye sockets and cheeks form
STEP No. 6. EARS, NOSTS, WINGS, NEEDLES, EYES
Before knitting this trifle, I advise you to collect a dragon. I sewed the head and hands. She hinged her legs so that the dragon would sit down.
Ears – 2 pcs.
Knit with green yarn
1 row: 6 sc into magic ring
2 row: 6 inc (12)
3 row: (sc, inc) – 6 times (18)
4 row: (2 sc, inc) – 6 times (24)
5 – 9 row: 24 sc
10 row: (2 sc, dec) – 6 times (18)
11 row: (1 sc, dec) – 6 times (12)
Do not stuff, fold and p rish to the head.
Nostrils – 2 pcs.
I knit right on the muzzle, like Daisy’s ears.
MARGARITKINS EARS.
Knit with flesh-colored yarn.
I always tie the ears directly on the head, for this at the eye level I retreat about 9 sc, attach the thread: 3 ch. lift, 8 dc. The tail that I stayed I enter above / below 2 rows and put out behind the ear, the second tail that remained after we attached the thread to the head, I hook on the third air. I introduce the lifting loop 2 rows higher / lower and put it out in the same hole as the first tail, I knot a knot and hide two tails in my head, it turns out very neat and beautiful.
Between 6 and 7 next we attach the thread: 3 ch. lifting, 9 dc (see photo), symmetrically perform 2 nostrils.
I Wings – 1 pc.
Knit with green yarn
1 row: 6 sc into magic ring
2 row: 6 inc (12)
3 row: (sc, inc) – 6 times (18)
4th row: (2 sc, inc) – 6 times (24)
5 row: (3 sc, inc) – 6 times (30)
6 row: (4 sc, inc) – 6 times (36)
7 row: (5 sc, inc) – 6 times (42)
8 row: (6 sc, inc) – 6 times (48)
9 row: (7 sc, inc) – 6 times (54)
10 row: (8 sc, inc) – 6 times (60)
11 row: (9 sc, inc) – 6 times (66)
12 row: (10 sc, inc) – 6 times (72)
Fold in half, knit for 2 loops 36 sc with yellow yarn, then knit arches of 6 ch. attaching to each 4 loop, we bind each arch – (4 sc, 3 ch. 4 sc) – 9 times.
Once again, I folded the finished wings and flashed them with hidden stitches with the usual thread so that they bristled.
Sew to the torso.
I Tips – 17 pcs.
1 row: 6 sc into magic ring
2 row: (2 sc, inc) – 2 times (8)
3 row: (3 sc, inc) – 2 times (10)
4 row: (4 sc, inc) – 2 times (12)
5 row: (5 sc, inc) – 2 times (14)
6 row: (6 sc, inc) – 6 times (16)
7 row: 16 sc
I didn’t stuff needles, we sew each to the torso
Eyes – 2 pcs.
The pupil with the protein crocheted No. 3
We start with a black thread
1 row: 6 sc into magic ring
2 row: 6 inc (12)
Go to white
3-5 rows: 12 sc
6 row: 1 sc, dec to the end of the row
Veko – hook number 2.5
1 row: 6 sc into magic ring
2 row: 6 inc (12)
3rd row: (sc, inc) – 6 times (18)
4-6 row: 18 sc
Embroider flare.
We insert the protein into the eyelid, between them the cilia, we glue everything and attach it to the head. I also stuck it to my head.
We decorate the dragon at our discretion, as you like!