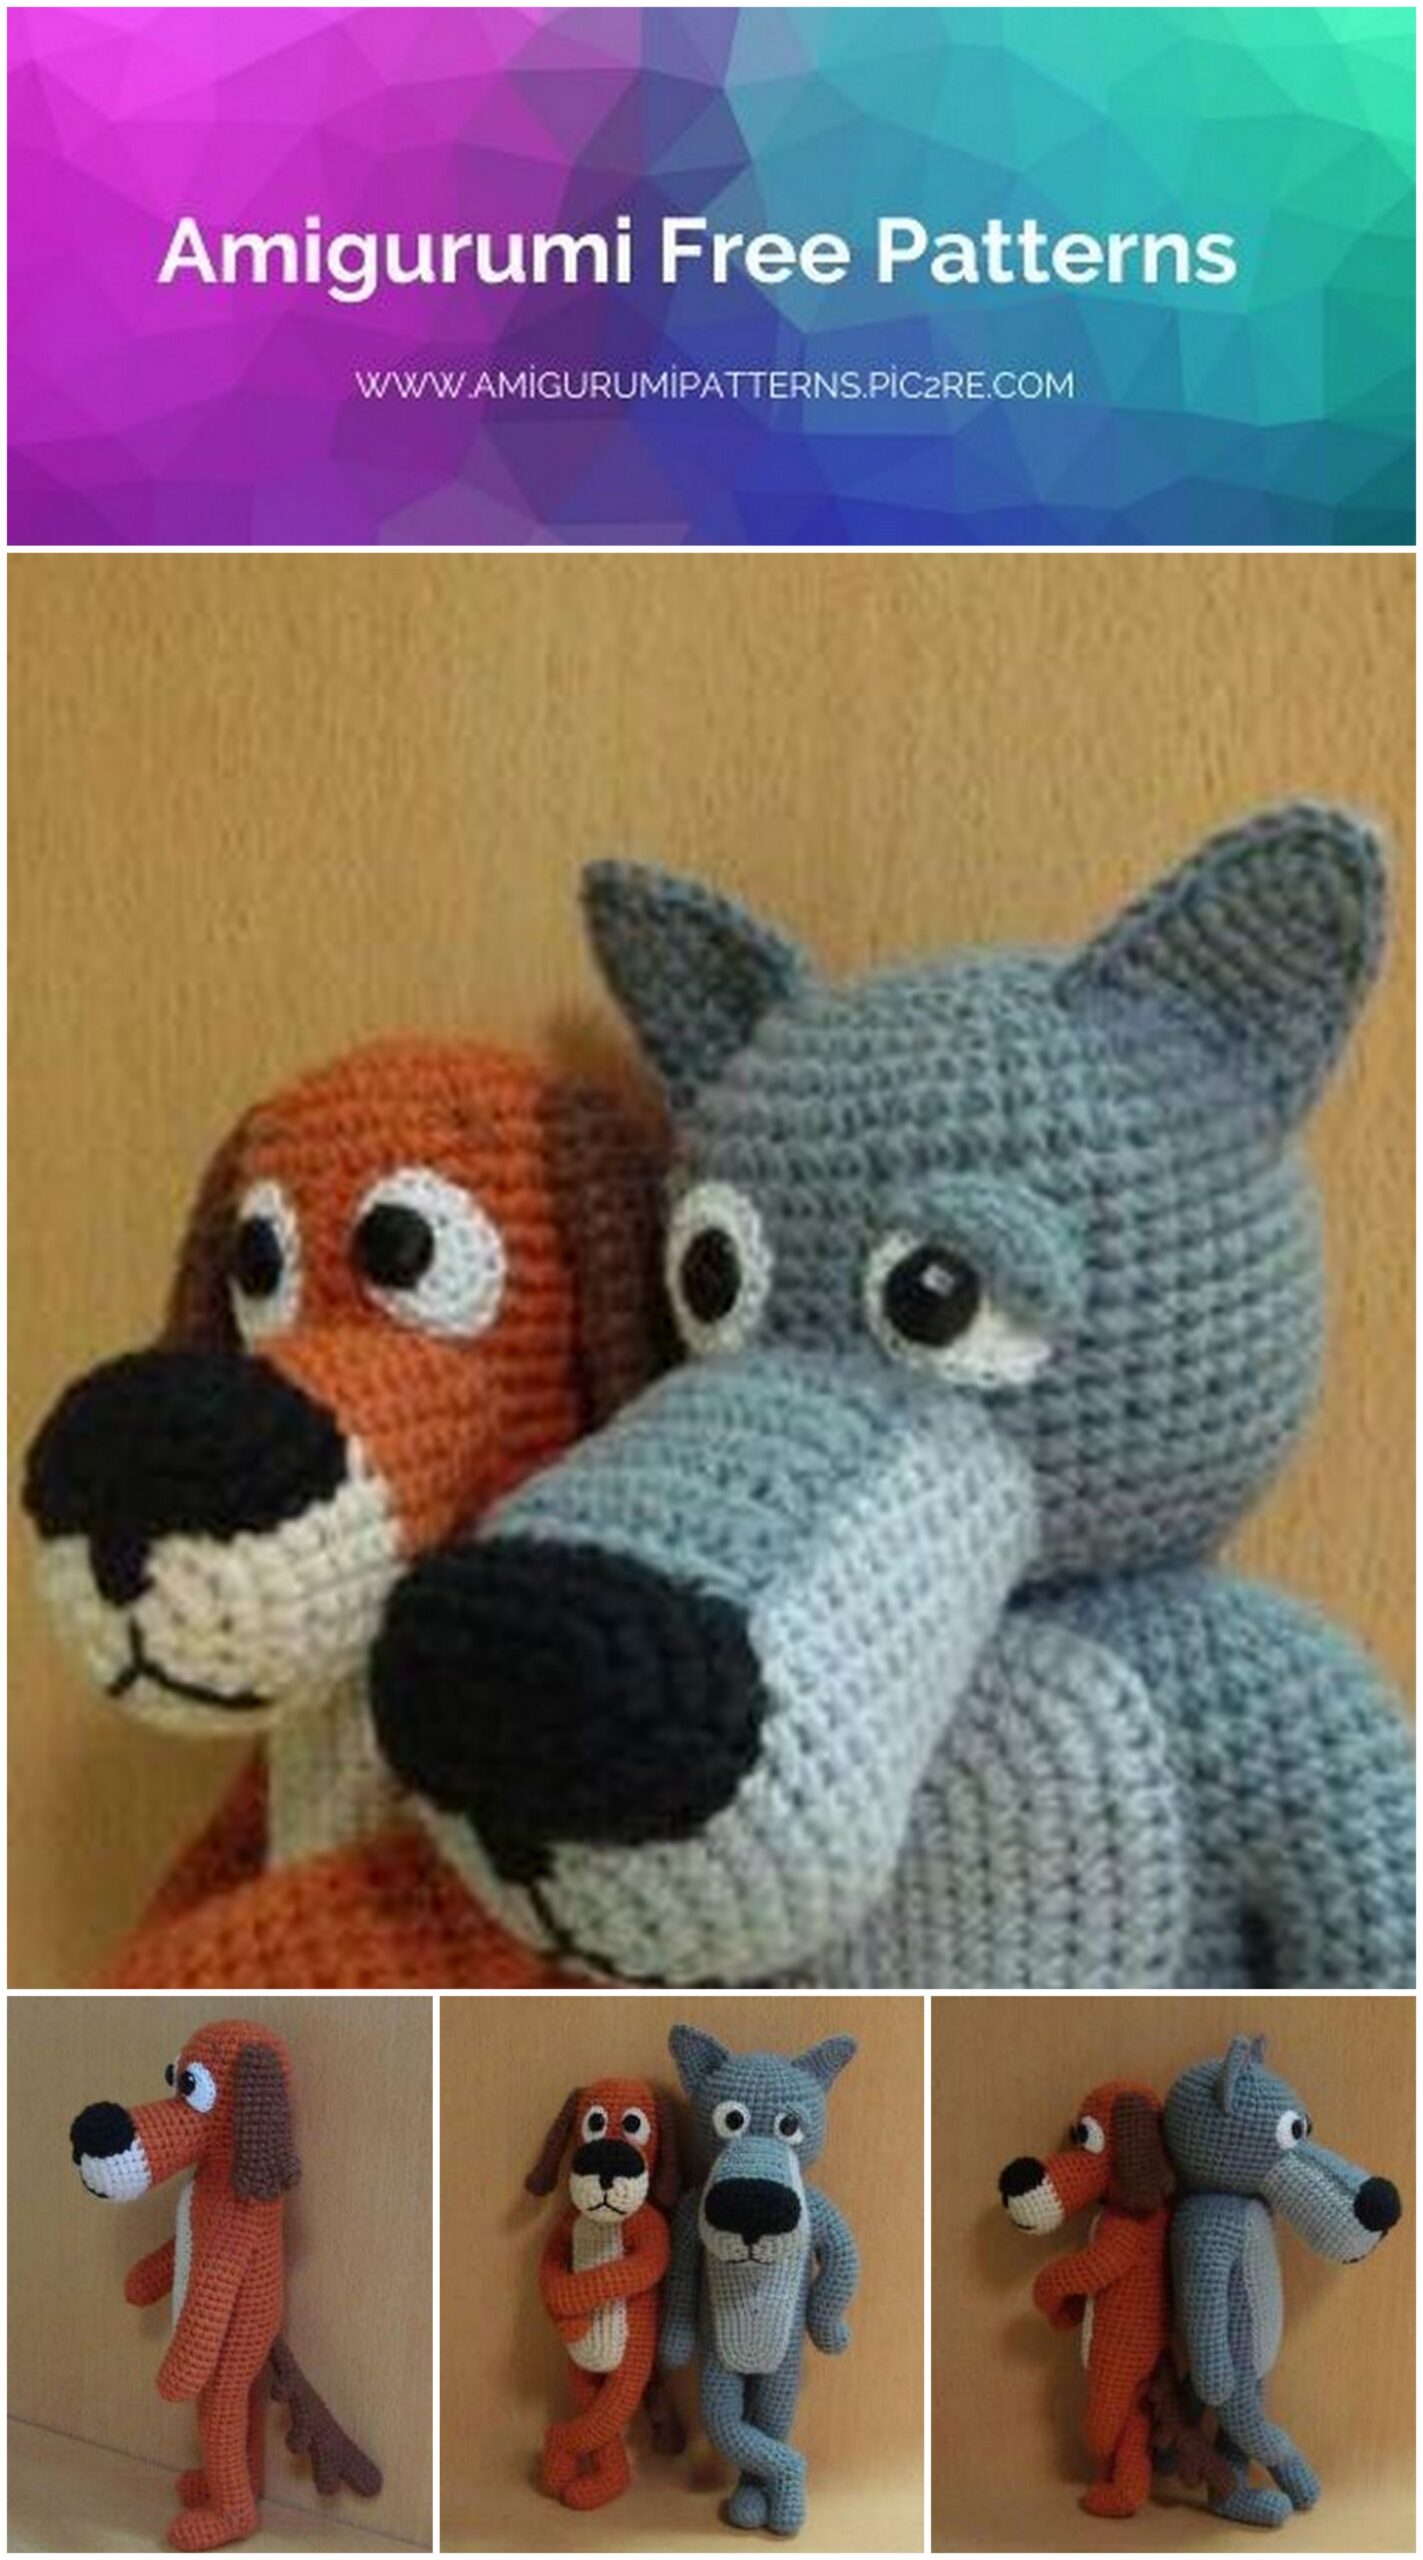
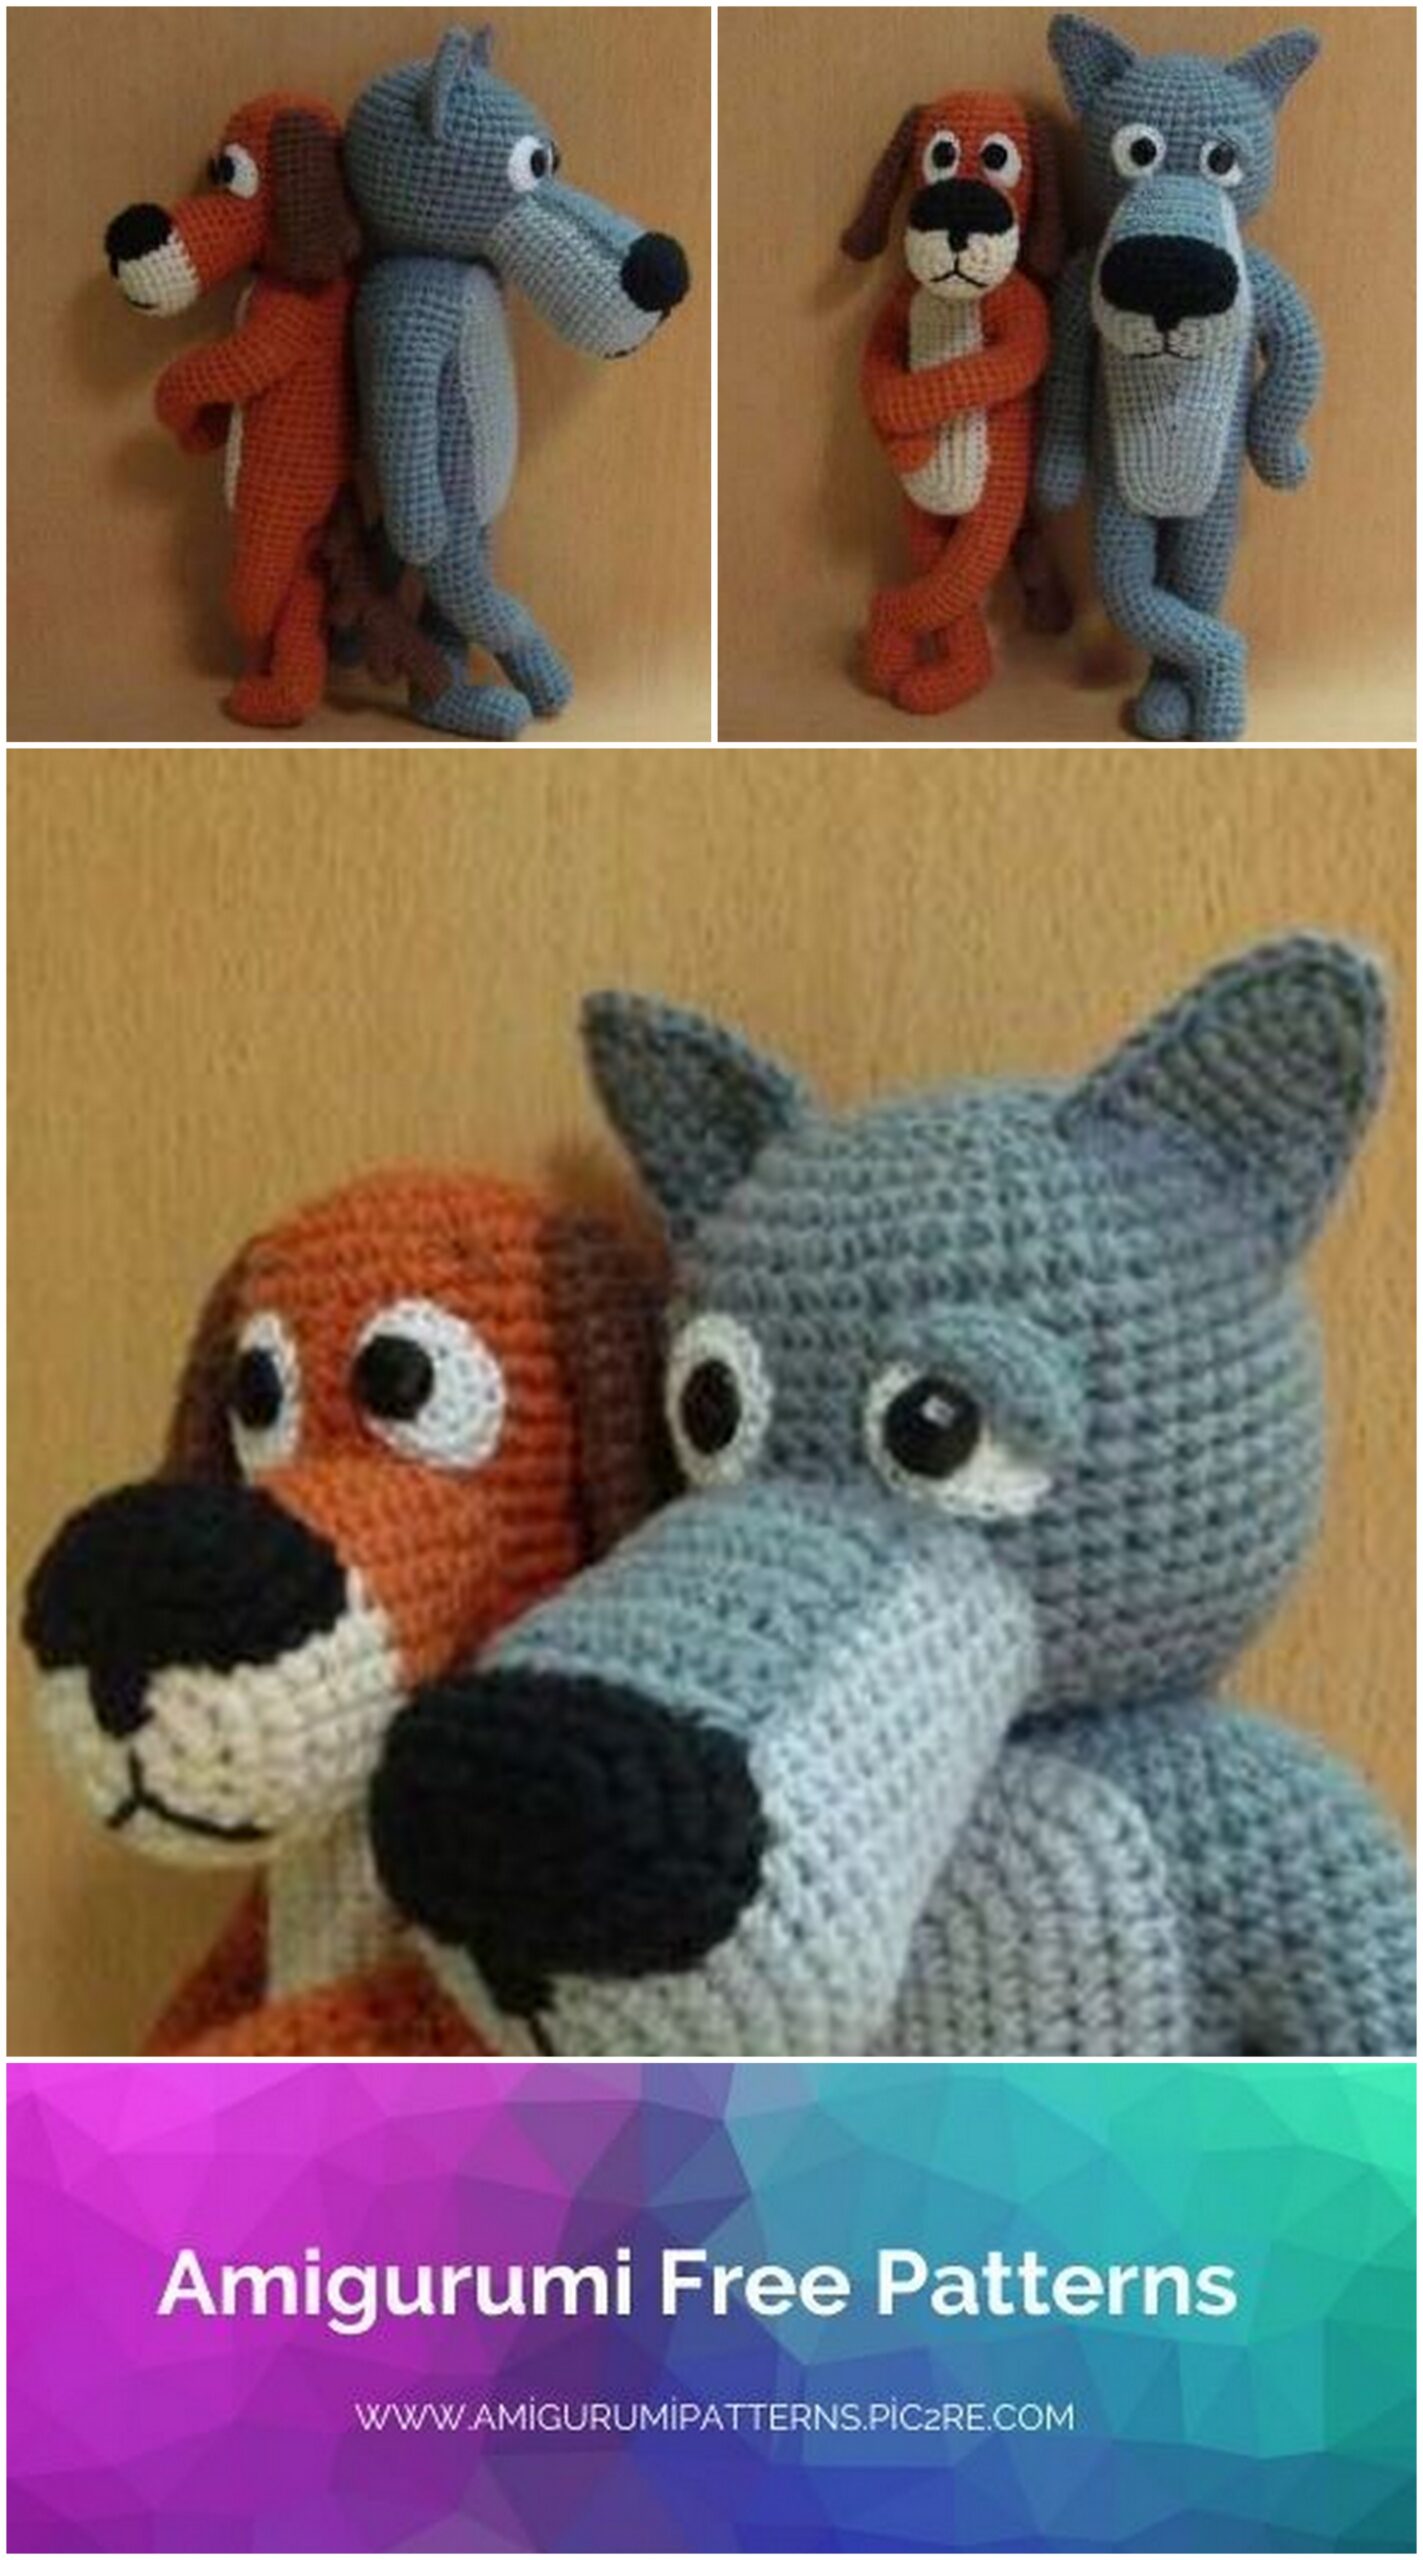
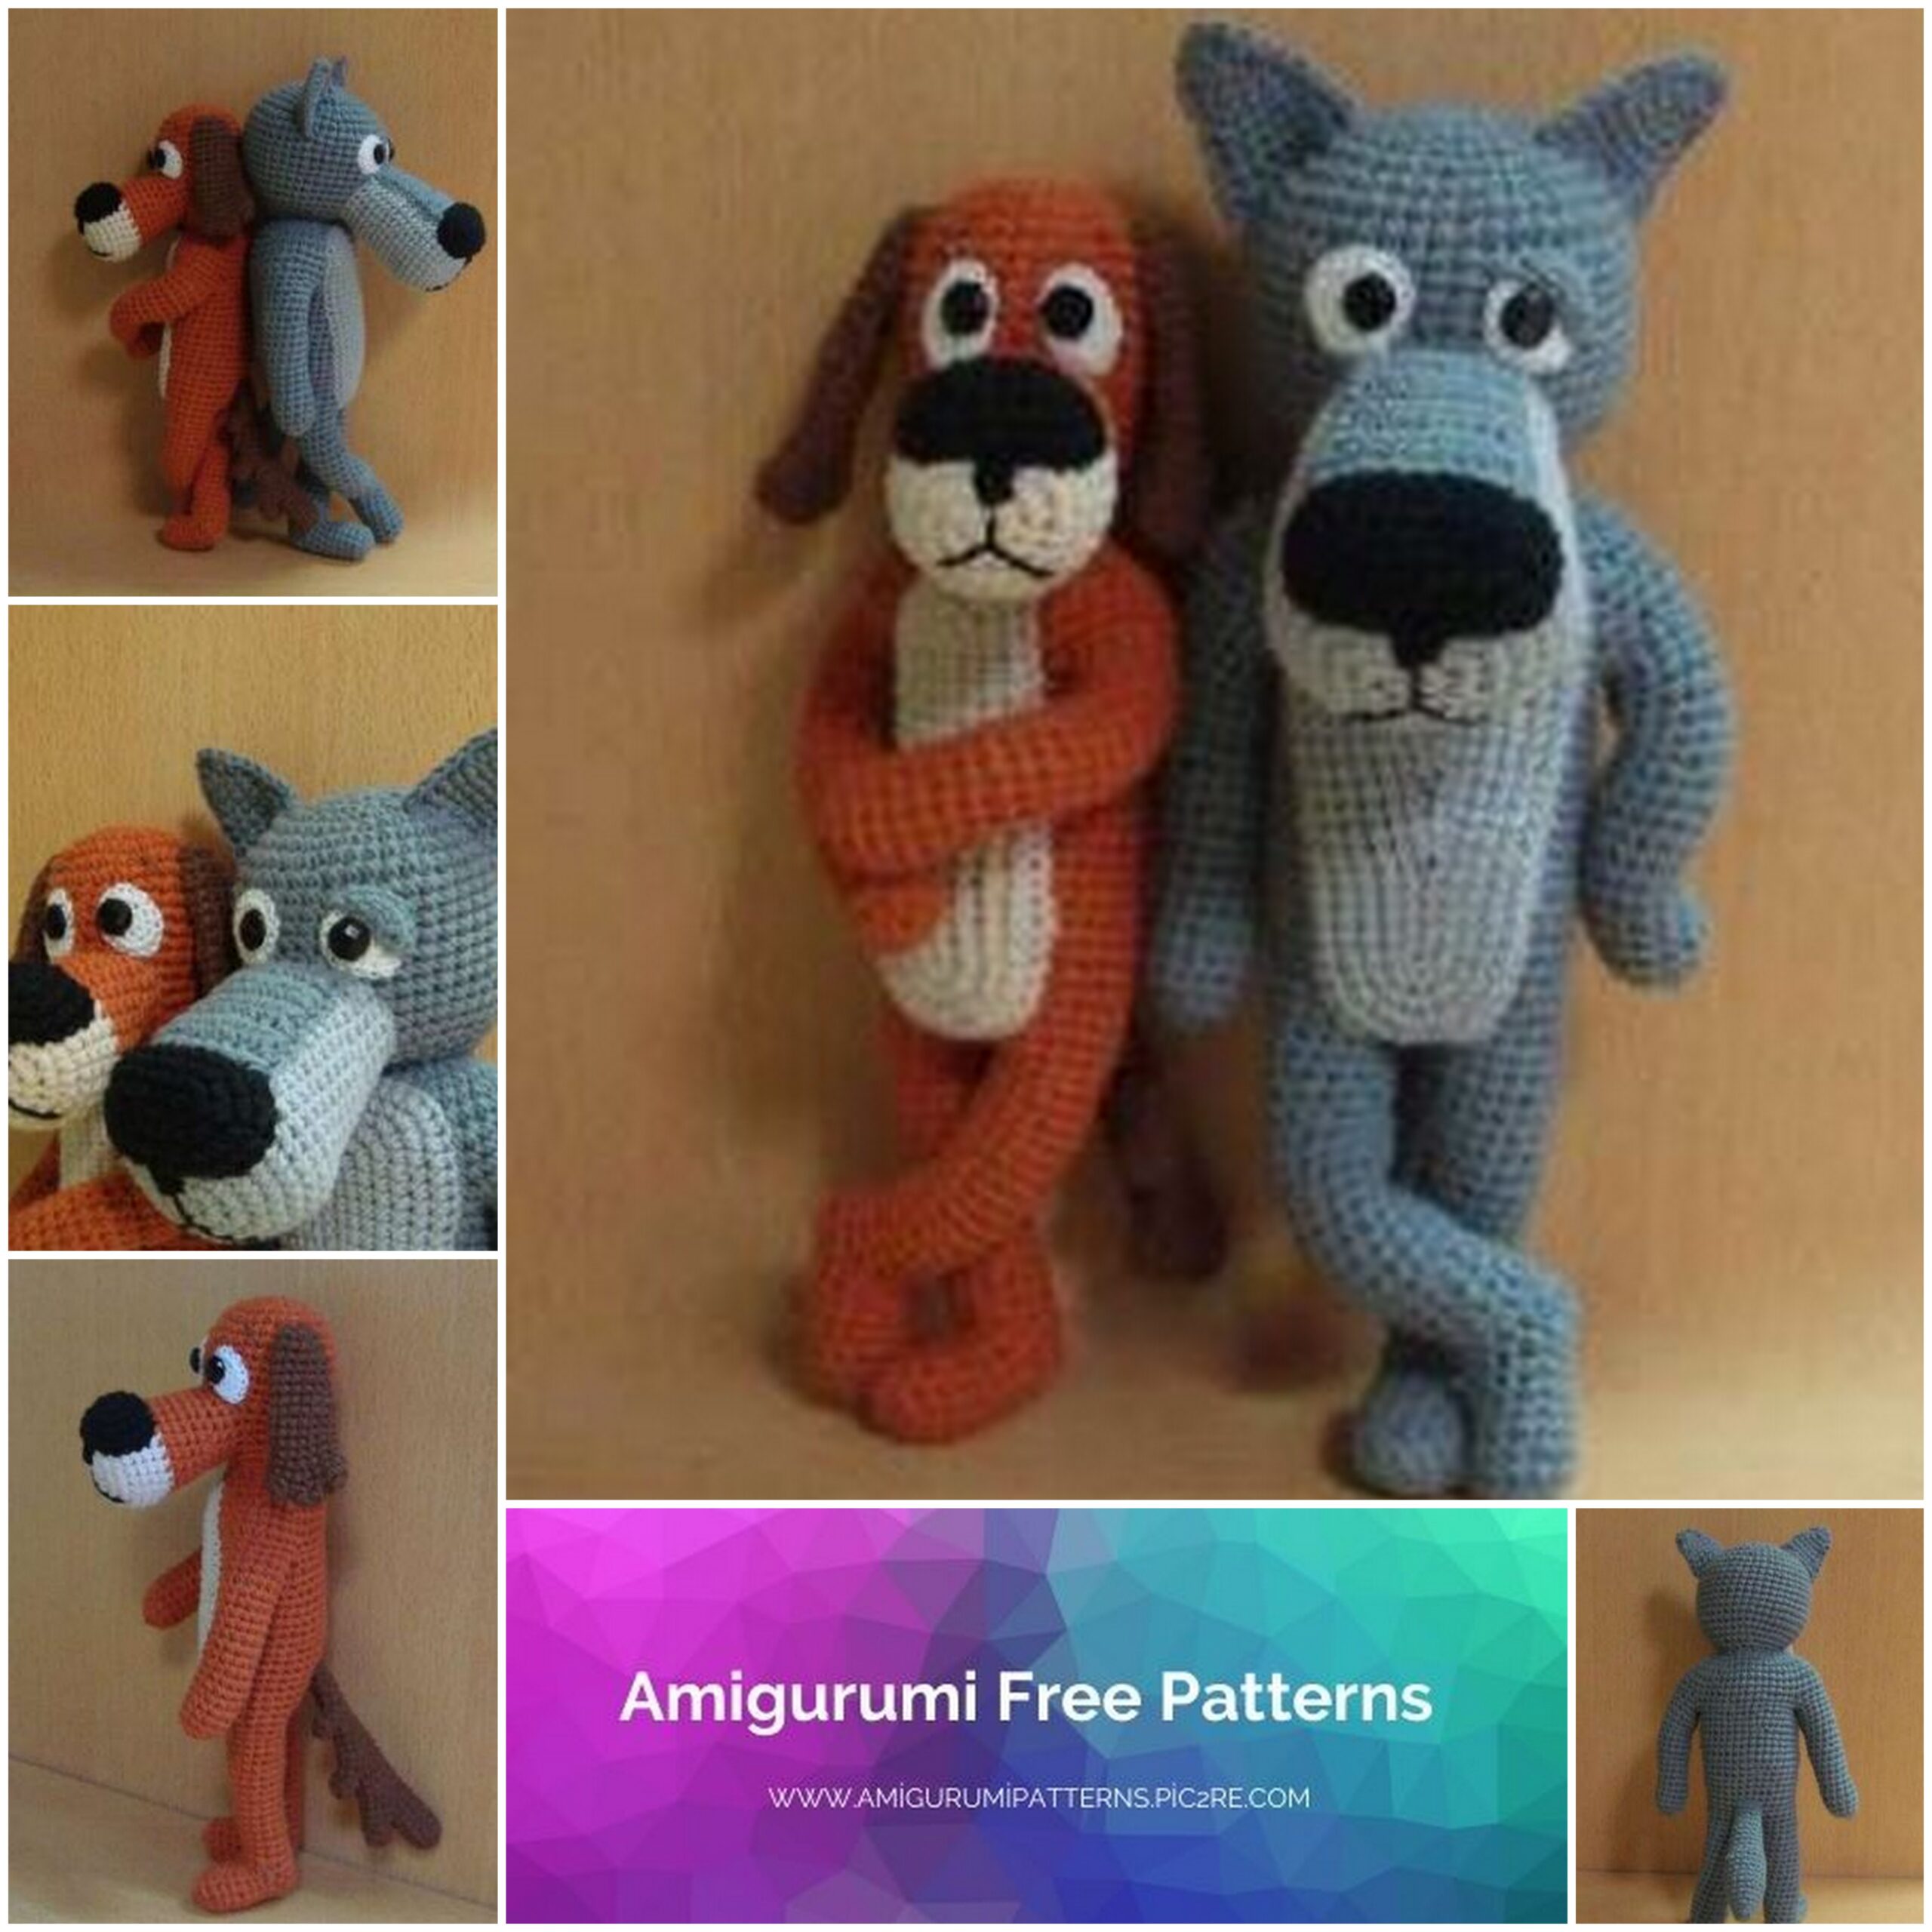
Amigurumi The Dog and The Wolf Free Pattern
Pinterest Offical Page : amigurumipatterns.pic2re.com
Facebook Group: amigurumipatterns.pic2re.com
Facebook Offical Page: amigurumipatterns.pic2re.com
Height 24-25 cm.
Tools and materials:
Hook 2.5 or 2 mm. Hook 1.5 or 1.25 for the eyes.
The filler is holofiber.
Yarn ALIZE Cotton Gold, 55% cotton, 45% acrylic, 330 m / 100 g. Analogous to the specified yarn
is YarnArt Jeans.
Colors
for a dog: brown, dark brown, beige, black;
for the wolf: gray, light gray, black.
Some fine white yarn for the eyes. VITA cotton COCO is suitable, another one (at least 200 m / 50 g) is possible.
Sew-on rhinestones d = 10 mm for eyes, 4 pcs.
Wire d = 2.5, braided 2 m
Legend:
CH () – air loop
SC () – single crochet
SL-ST () – connecting post
İNC () – increase
DEC () – decrease
() * 6 – repeat 6 times
İNC 3in1 () – 3 single crochet, knitted in the same column of the previous row.All details, unless otherwise indicated, are knitted in a circle.
WE KNIT PSA
Making a frame for the doggie. We cut off 4 pieces of wire: 2 by 30 cm, 2 by 20 cm, from one end we wind them with adhesive tape. The short ones go into the arms, the long ones go into the legs.


Head-torso – legs (brown):
1 p: 6 SC in the amigurumi ring
2 p: 6 İNC = 12 SC
3 p: (İNC, 1 SC) * 6 = 18 SC
4 p: (2 SC, İNC) * 6 = 24 SC
5 p: (İNC, 3 SC) * 6 = 30 SC
6-17 RR: 30 SC
18 p: (2 SC, DEC, 1 SC) * 6 = 24 SC
19 p: (DEC, 1 SC) * 8 = 16 SC
R20: 16 SC
We stuff our head.
21 p: (İNC, 7 SC) * 2 = 18 SC
22 p: (İNC, 1 SC, 4 İNC, 1 SC, İNC, 1 SC) * 2 = 30 SC
23 p: 30 SC
24 p: 4 SC, İNC, 1 SC, İNC, 1 SC, İNC, 10 SC, İNC, 1 SC, İNC, 1 SC, İNC, 6 SC = 36 SC
Rp 25-27: 36 SC
We take the frame and with the fastened side insert it deeper into the head (into a well-stuffed head).
Further we will separate the hands.
28 p: 4 SC, 6 CH, straighten one short wire outward, skip 9 SC, starting from the 10th we knit 9 SC, 6 CH, straighten the second short wire, skip 9 SC, starting from the 10th we knit 5 SC, row closed = 30 SC
R 29: 30 SC
We knit air loops in this row for the back walls, for the front we will pick up our hands.
30-46 RR: 30 SC
We fill the torso.
We begin to knit legs. We mark 3 middle loops in front and behind, we count the loops between the marks: there should be 12 loops on both sides. We tie (or dissolve) the columns to the nearest mark.
SC We collect 4 CH, bring out one wire and connect them on the other side of SC to the first column after the marks, in this place is now the beginning of the row.
47 p: with the first column we connected the CH chain, we knit another 15 SC = 16 SC
We knit air loops in this row for the back walls.
48 p: 13 SC, DEC, 1 SC = 15 SC
Rp 49-54: 15 SC
We gradually stuff the leg, making sure that the wire remains in the middle.
55 p: 13 SC, DEC = 14 SC
Rp 56-61: 14 SC
62 p: DEC, 12 SC = 13 SC
Rp 63-64: 13 SC
We stuff the leg so that it takes shape, mark the 5 front columns, do not touch them yet (this will be the sock), first we knit the heel – 8 columns at the back. So far, we have the same torso on both sides, so the front will be where we want (just not on the side).
65 r: we knit SC to the marked front columns, dial 6 CH, skip the 5 front ones (we bring the wire into the hole at the marked columns) and tie the row SC = 14
In the next row we knit air loops on the back wall, then we will hook up the sock on the front one.
66 p: (DEC, 5 SC) * 2 = 12 SC
67 p: 6 DEC = 6 SC
We make SL-ST, cut the thread, pull the tip through all the loops, tighten the hole.
We knit a sock:
1 p: we collect along the hole: 6 SC along the air loops (for the remaining free front wall) + 1 SC grab on the side between the air and left posts so that there are no holes + 5 SC along the skipped front posts + 1 SC grab on the side = 13 SC
5 front posts
2 p: 13 SC
We bend the wire, cut it so that ≈ 1 cm remains outside, wrap the end with a piece of plaster. We fill the heel.
3-8 pp: 13 SC
We fill the foot
9 p: 6 DEC, SL-ST, finish stuffing, cut the thread and tighten the hole.
We begin to knit the second leg. Our left leg is tied, we start the second from the front. If the right leg is tied, you need to start the second one from the back, so that, as you knit, immediately dial CH between the legs. We count from the first leg 3 loops, we attach the thread to the 4th.
We collect 4 CH and attach them on the other side of SC, there should also be 3 loops between the legs, in this place is now the beginning of the row. Do not forget to bring the wire to the second leg.
3 columns We knit the second leg. We repeat 47-67 pp and 1-9 pp of the foot.
We feed the torso through the hole between the legs. Draw 14 SC along the hole.
We knit the next row 7 DEC, finish the stuffing, cut the thread and tighten the hole.
Hands (brown), 2 pcs:
1 p: we collect along the hole: 6 SC along the air, 1 SC we grab on the side so that there is no hole, 9 SC on the shoulder and 1 SC on the side = 17 SC
2 p: 6 SC, DEC, 7 SC, DEC = 15 SC
3-6 pp: 15 SC
We gradually fill our hand, making sure that the wire remains in the middle.
7 p: 2 SC, DEC, 11 SC = 14 SC
8-11 RR: 14 SC
12 p: 3 SC, DEC, 9 SC = 13 SC
13-18 RR: 13 SC
Cut off the excess wire, wrap the tip with a plaster.
19-20 RR: 13 SC
21 p: 6 DEC, SL-ST, finish packing, cut the thread, tighten from verst.
Through the hole on the shoulder, if necessary, fill the body denser. In the same way, we knit the other hand, repeating 1-21 pp.
Belly (beige):
We put on a chain of 16 CH (the loop on the hook does not count). We knit in a circle. We knit air loops in the first row in one wall.
1 p: starting from the 2nd loop from the hook (the loop on the hook does not count) İNC, 13 SC, 5 SC into one
loop (this should be the outermost loop of the chain), continue in a circle: 13 SC, 3 SC in one
loop (this should also be the outermost loop of the chain from which the row began) = 36 SC
2 p: İNC, 14 SC, 5 İNC, 14 SC, 2 İNC = 44 SC
3 p: İNC, 8 SC, İNC, 7 SC, İNC, 2 SC, İNC, 2 SC, İNC, 7 SC, İNC, 10 SC, 2 İNC = 52 SC
4 p: 52 SC
We make SL-ST, cut the thread, leaving a long end for sewing, fasten.
We pin, slightly stretching, sew, starting from the top.
Muzzle (beige, brown):
We start knitting with beige thread
1 p: 8 SC in the amigurumi ring
2 p: (2 İNC 3in1, 2 SC) * 2 = 16 SC
3 p: 2 SC, İNC 3in1, İNC, İNC 3in1, 5 SC, İNC 3in1, İNC, İNC 3in1, 3 SC = 26 SC
4-7 pp: 26 SC
8 p: 9 SC, DEC, 3 SC, DEC, 10 SC = 24 SC on the last column of the row, switch to brown.
9-10 pp: 24 SC
11 p: (DEC, 10 SC) * 2 = 22 SC
12-13 RR: 22 SC
14 p: (5 SC, DEC, 4 SC) * 2 = 20 SC
RR 15-16: 20 SC
We make SL-ST, cut the thread, leaving the end for
sewing, fix.
Color transition when sewing at the top. Stuff the face. Sew on 12 rows from the crown. The muzzle is oval so oval and sew. The dog should look slightly to the side. We do not sew until the end, when a small hole remains, fill it more tightly and finish sewing.
Nose (black):
We put on a chain of 4 CH, the loop on the hook does not count.
1 p: starting from the 2nd loop from the INC hook, 1 SC, 5 SC into one loop (this should be the extreme loop of the chain), continue in a circle: 1 SC, 3 SC into one loop (this should also be the extreme loop from the chain with which the row began) = 12 SC
2 p: İNC, 3 SC, 3 İNC, 3 SC, 2 İNC = 18 SC
3 p: 1 SC, İNC, 4 SC, İNC, 1 SC, İNC, 1 SC, İNC, 4 SC, İNC, 1 SC, İNC = 24
4 p: 16 SC, [we make SL-ST in the next column, 3 CH, return along the air 2 SC, SL-ST in the same column from which we started], 7 SC We make SL-ST, cut the thread, leaving a long end for sewing, fasten.
12 rows
Cover the transition of the row with the upper part of the nose.
The strip should be a row above the starting ring.
We put filler, pin it where it is required that the nose be a pronounced oval (or even a rectangle) and sew it on. Before sewing on completely, we fill a little more. Do not cut the remaining thread.
We draw the thread at the bottom, where the nose strip ends.
We make a stitch 2 rows down, draw the thread on the side a couple of rows below.
Make a large stitch across, passing the thread under the first stitch. We fix the thread on the black nose.
Eyes (white), 2 pcs:
We take a thin thread, hook 1.5
1 p: 6 SC in the amigurumi ring
2 p: 6 İNC = 12 SC
3 p: 3 İNC, 3 SC, 3 İNC, SL-ST – incomplete row
We cut the thread, leaving the end for sewing, fasten it.
Sew the eyes just above the muzzle, between them ≈ 2 columns. Sew on with an oval, slightly spreading to the sides at the bottom.
Sew the rhinestone pupils obliquely inward just above the middle of the eye. Sew on 2 stitches with bobbin thread in half, that’s enough. With each stitch, pull the thread tightly (but neatly) so that the strass fits snugly.
Ears (dark brown), 2 pcs:
1 p: 6 SC in the amigurumi ring
2 p: (İNC, 2 SC) * 2 = 8 SC
We make SL-ST, cut the thread, fasten.
We knit two more of the same parts, repeating 1-2 pp, on one we leave the end for sewing, we cut the thread, we do not cut the thread on the other.
In 3 p, we connect all three parts together, skipping 2 columns. We bring the end to the outside for sewing.
3 r: 2 SC of the 1st piece + 6 SC of the 2nd piece + 2 SC of the 1st piece + 6 SC of the 3rd piece = 16 SC
4 p: 16 SC
5 p: (DEC, 6 SC) * 2 = 14 SC
Sew up the holes between the ear pieces.
6-10 pp: 14 SC
11 p: (5 SC, DEC) * 2 = 12 SC
12-15 pp: 12 SC
16 p: (DEC, 4 SC) * 2 = 10 SC
17 p: (1 SC, DEC, 2 SC) * 2 = 8 SC
We don’t stuff our ears. We make SL-ST, cut the thread, leaving the end for sewing, fasten.
Sew on the ears on the sides, at a distance of 5 rows from the crown. When sewing, we grab it 3-4 rows down so that they do not stick out, but hang. With the same thread, we embroider small eyebrows with ordinary stitches.
Tail (dark brown):
Detail 1:
1 p: 6 SC in the amigurumi ring
2 p: 6 SC
We make SL-ST, cut the thread, fasten.
Detail 2:
1 p: 6 SC in the amigurumi ring
2 p: (İNC, 2 SC) * 2 = 8 SC
3 p: 8 SC
We make SL-ST, cut the thread, fasten.
Detail 3:
1 p: 6 SC in the amigurumi ring
2 p: (İNC, 2 SC) * 2 = 8 SC
3 p: (3 SC, İNC) * 2 = 10 SC
4 p: 10 SC
We make SL-ST, cut the thread, fasten.
Detail 4:
1 p: 6 SC in the amigurumi ring
2 p: (İNC, 2 SC) * 2 = 8 SC
3 p: (3 SC, İNC) * 2 = 10 SC
4-7 pp: 10 SC
We continue to knit the 4th part, the rest will be gradually attached to it.
8 r: we knit 1 SC, put part 3 in front (10 loops) and knit 2 SC through both parts, connecting them, finish row 7 SC As a result, row 16 SC was formed
16 SC
9 p: (DEC, 6 SC) * 2 = 14 SC, the decreases should be at the junction of the parts
10 p: 14 SC
11 p: DEC, 4 SC, DEC, 6 SC = 12 SC
12-13 RR: 12 SC
We will not stuff the tail, if you wish, you can stuff it, but just a little.
14 p: 2 SC, put detail 2 in front (8 loops), knit 2 SC through both parts, connecting them, finish row 8 SC.
As a result, a series of 16 SC
15 p: 1 SC, DEC, 4 SC, DEC, 7 SC = 14 SC
16 p: 14 SC
17 p: DEC, 4 SC, DEC, 6 SC = 12 SC
18 p: 2 SC, DEC, 4 SC, DEC, 2 SC = 10 SC
19 p: 10 SC
20 p: 2 SC, put detail 1 in front (6 loops), knit 2 SC through both parts, connecting them, finish row 6 SC.
As a result, a series of 12 SC
21 p: 1 SC, DEC, 2 SC, DEC, 5 SC = 10 SC
22-23 RR: 10 SC
24 p: (DEC, 3 SC) * 2 = 8 SC
25 p: 8 SC
We make SL-ST, cut the thread, leaving the end for sewing, fasten.
Sew on the tail in the lower back, with the details downward-obliquely.
WE KNIT A WOLF
We make the same frame as for the dog.
Head-torso – legs (gray):
1 p: 6 SC in the amigurumi ring
2 p: 6 İNC = 12 SC
3 p: (İNC, 1 SC) * 6 = 18 SC
4 p: (2 SC, İNC) * 6 = 24 SC
5 p: (İNC, 3 SC) * 6 = 30 SC
6 p: (3 SC, İNC, 1 SC) * 6 = 36 SC
7 p: (İNC, 5 SC) * 6 = 42 SC
8 p: (4 SC, İNC, 9 SC) * 3 = 45 SC
9-19 pp: 45 SC
20 p: (DEC, 7 SC) * 5 = 40 SC
21 p: (2 SC, DEC, 1 SC) * 8 = 32 SC
22 p: (DEC, 2 SC) * 8 = 24 SC
23 p: (1 SC, DEC) * 8 = 16 SC
We stuff our head.
24 p: (5 İNC, 1 SC, İNC, 1 SC) * 2 = 28 SC
25 p: (1 SC, İNC, 1 SC, 4 İNC, 1 SC, İNC, 5 SC) * 2 = 40 SC
26 p: (İNC, 9 SC) * 4 = 44 SC
27 p: (6 SC, İNC, 4 SC) * 4 = 48 SC
28-31 pp: 48 SC
We take the frame, insert the fastened side deeper into the head. Let’s separate our hands.
32 p: 6 SC, 6 CH, straighten one short wire outward, skip 9 SC, starting from the 10th we knit 15 SC, 6 CH, straighten the second short wire, skip 9 SC, starting from the 10th we knit 9 SC, row closed = 42 SC
R 33: 42 SC
We knit air loops in this row for the back walls, for the front we will pick up our hands.
34 p: (10 SC, DEC, 9 SC) * 2 = 40 SC
Rp 35-36: 40 SC
37 p: (DEC, 18 SC) * 2 = 38 SC
Rp 39-40: 38 SC
41 p: (9 SC, DEC, 8 SC) * 2 = 36 SC
42-43 RR: 36 SC
44 p: (DEC, 16 SC) * 2 = 34 SC
R45: 34 SC
46 p: (8 SC, DEC, 7 SC) * 2 = 32 SC
R 47: 32 SC
48 p: (DEC, 14 SC) * 2 = 30 SC
Rp 49-51: 30 SC
We fill the torso.
We begin to knit legs. We knit the legs in the same way as for a dog, they will differ only in the length of the foot. We mark 3 middle loops in front and behind, we count the loops between the marks: there should be 12 loops on both sides. We tie (or dissolve) the columns to the nearest mark. We collect 4 CH, bring out one wire and attach the chain on the other side of SC to the first column after the marks, in this place is now the beginning of the row.
52 p: with the first column we connected the CH chain, we knit another 15 SC = 16 SC
We knit air loops in this row for the back walls.
53 p: 13 SC, DEC, 1 SC = 15 SC
RR 54-59: 15 SC
We gradually stuff the leg, making sure that the wire remains in the middle.
60 p: 13 SC, DEC = 14 SC
Rp 61-65: 14 SC
66 p: DEC, 12 SC = 13 SC
Rp 67-68: 13 SC
We stuff the leg so that it takes shape, mark the 5 front columns, (this will be the sock), first we knit the heel – 8 columns at the back.
69 r: we knit SC to the marked front columns, we collect 6 CH, 5 front we skip
(we put the wire into the hole at the marked columns) and tie a row SC = 14
In the next row we knit air loops behind the back wall, behind the front then
we will pick up the sock.
70 p: (DEC, 5 SC) * 2 = 12 SC
71 p: 6 DEC = 6 SC
We make SL-ST, cut the thread, pull the tip through all the loops, tighten the hole.
We knit a sock:
1 p: we collect along the hole: 6 SC along the air loops (for the remaining free front wall) + 1 SC grab on the side between the air and left posts so that there are no holes + 5 SC along the skipped front posts + 1 SC grab on the side = 13 SC
2 p: 13 SC
We bend the wire, cut it so that ≈ 1 cm remains outside, wrap the end with a piece of plaster. We fill the heel.
3-9 pp: 13 SC
We fill the foot
10 p: 6 DEC, SL-ST, finish stuffing, cut the thread and tighten the hole.
We knit the second leg. We count from the first leg 3 loops, we attach the thread to the 4th. We collect 4 CH and attach them on the other side of SC, there should also be 3 loops between the legs, in this place is now the beginning of the row. Do not forget to bring the wire to the second leg.
We repeat 52-71 pp and 1-10 pp of the foot. We feed the torso through the hole between the legs.
Draw 14 SC along the hole. We knit the next row 7 DEC, finish the stuffing, cut the thread and tighten the hole.
Hands (gray), 2 pcs:
1 p: we collect along the hole: 6 SC along the air, 1 SC we grab on the side so that there is no hole, 9 SC on the shoulder and 1 SC on the side = 17 SC
2 p: 6 SC, DEC, 7 SC, DEC = 15 SC
3-6 pp: 15 SC
We fill the shoulder well. We fill our hand gradually, making sure that the wire remains in the middle.
7 p: 2 SC, DEC, 11 SC = 14 SC
8-11 RR: 14 SC
12 p: 3 SC, DEC, 9 SC = 13 SC
13-18 RR: 13 SC
Cut off the excess wire, wrap the tip with a plaster.
19-20 RR: 13 SC
21 p: 6 DEC, SL-ST, finish packing, cut the thread, tighten the hole.
In the same way, we knit another ru ku, repeating 1-21 pp.
Belly (light gray):
The diagram of the belly indicates 1-6 pp, 7 p only in the description below.
We put on a chain of 16 CH (the loop on the hook does not count). We knit in a circle. We knit air loops in the first row in one wall.
1 p: starting from the 2nd loop from the hook (the loop on the hook does not count) İNC, 5 SC, make 1 CH, unfold the knitting, skip it under the chain, continue knitting back to the beginning of the row: 5 SC, İNC 3in1 (this should be the extreme loop of the chain with which the row began)
2 p: İNC, 10 SC, make 1 CH, unfold knitting, skip it under the chain, continue knitting back to the beginning of the row:
10 SC, 2 İNC
3 p: 2 İNC, 14 SC, 5 SC in one loop (this should be the extreme loop of the chain), continue in a circle: 14 SC, 2 İNC, 2 SC = 43 SC
4 p: 1 SC, 2 İNC, 16 SC, 3 İNC, 16 SC, 2 İNC, 3 SC = 50 SC
5 p: 2 SC, İNC, 19 SC, 3 İNC, 20 SC, İNC, 4 SC = 55 SC
6 p: 2 SC, 2 İNC, 19 SC, İNC, 1 SC, 3 İNC, 1 SC, İNC, 18 SC, 2 İNC, 5 SC = 64 SC
7 p: 64 SC
We make SL-ST, cut the thread, leaving a long end for sewing, fasten.
We pin, slightly stretching, with a wide edge up, sew.
Muzzle (light gray):
1 p: 8 SC in the amigurumi ring
2 p: (2 İNC 3in1, 2 SC) * 2 = 16 SC
3 p: 2 SC, İNC 3in1, İNC, İNC 3in1, 5 SC, İNC 3in1, İNC, İNC 3in1, 3 SC = 26 SC
4 p: 3 SC, İNC 3in1, 4 SC, İNC 3in1, 7 SC, İNC 3in1, 4 SC, İNC 3in1, 4 SC = 34 SC
5 p: 7 SC, İNC, 16 SC, İNC, 9 SC = 36 SC
6-9 pp: 36 SC
10 p: 11 SC, DEC, (2 SC, DEC) * 3, 11 SC = 32 SC
11-12 RR: 32 SC
13 p: (DEC, 14 SC) * 2 = 30 SC
14-15 RR: 30 SC
16 p: (7 SC, DEC, 6 SC) * 2 = 28 SC
17-18 RR: 28 SC
19 p: (DEC, 12 SC) * 2 = 26 SC
R20: 26 SC
We make SL-ST, cut the thread, leaving the end for sewing, fasten.
We stuff the face. The place where you finished knitting is the upper part. Our wolf is looking straight ahead.
Sew on at a distance of 14 rows from the crown. We do not sew until the end, when a small hole remains, fill it more tightly and finish sewing.
Nose stripe (gray):
We will knit in rows back and forth. We start each next row in the 2nd loop from the hook (the loop on the hook does not count). So that the knitting is more even, it is better to knit with the front and back rows. The purl stitches are knitted in the same way as usual, only the hook is inserted from behind the fabric forward and the thread is picked up from the front.
Find and mark 6 middle columns. On them we will dial a gray bar.
1 p: we will type SC right on the head close to the muzzle. Leave the initial end of the thread ≈ 2 m. Attach the thread at the mark, make CH – this is the first column of the row, dial 5 more SC, make CH, unfold the knitting.
2 p: 6 SC out, CH, unfold
3 p: 3 SC, İNC, 2 SC = 7 SC, CH, expand
4 p: 7 SC out, CH, unfold
5 p: 7 SC, CH, expand 6 columns
6 p: 7 SC out, CH, unfold
7 p: 3 SC, İNC, 3 SC = 8 SC, CH, expand
8 p: 8 SC out, CH, unfold
9 p: 8 SC, CH, expand
10 p: 8 SC out
We cut the thread, fix it, put the end inside when sewing.
With the left starting end we tie the SC part. On the sides, we make the columns in the intervals between the rows, in the corners we knit İNC 3in1.
We pin and sew with the same thread.
Nose (black):
We knit the nose like that of a dog, only wider due to the longer initial chain of CH. We put on a chain of 6 CH, the loop on the hook does not count.
1 p: starting from the 2nd loop from the INC hook, 3 SC, 5 SC into one loop (this should be the extreme loop of the chain), continue in a circle: 3 SC, 3 SC into one loop (this should also be the extreme loop from the chain with which the row began) = 16 SC
2 p: İNC, 5 SC, 3 İNC, 5 SC, 2 İNC = 22 SC
3 p: 1 SC, İNC, 6 SC, İNC, 1 SC, İNC, 1 SC, İNC, 6 SC, İNC, 1 SC, İNC = 28
4 p: 19 SC, [in the next column we do SL-ST, 3 CH, return by air 2 SC, SL-ST to the same column from which we started], 8 SC
We make SL-ST, cut the thread, leaving a long end for sewing, fasten.
Cover the last row of the gray stripe with the upper part of the nose. The stripe at the bottom of the nose should be a row above the starting ring. We put filler, pin and sew.
Before sewing on completely, we fill a little more.
We do not cut the remaining thread, we output it below, under the nose. Like a dog, we embroider a mouth: a stitch 3 rows down, the thread is brought out from the side below, a stitch across, passing the thread under the first stitch.
We fix the thread on the black nose.
Eyes (white), 2 pcs:
We take a thin thread, hook 1.5
1 p: 6 SC in the amigurumi ring
2 p: 6 İNC = 12 SC
3 p: (İNC, 1 SC) * 6 = 18 SC
4 p: 4 SC, SL-ST – incomplete row (just because the eye seemed too small)
We cut the thread, leaving the end for sewing, fasten it.
Sew the eyes just above the muzzle, between them ≈ 2.5 columns.
Sew the rhinestone pupils slightly obliquely inward, at a height of about the middle of the eye.
Eyelid (gray):
1 p: 5 SC in an amigurumi ring, do not close the ring, do CH, unfold knitting
2 p: İNC, 3 SC, İNC = 7 SC
We cut the thread, leaving the end for sewing, fasten it.
We take the initial end of the thread to the semicircular edge (we will only sew it), put the eyelid to the eye and remove the initial end of the thread to the head.
Sew the eyelid close to the eye.
Ears (se ry), 2 pcs:
1 p: 6 SC in the amigurumi ring
2 p: (2 SC, İNC) * 2 = 8 SC
3 p: İNC, 7 SC = 9 SC
4 p: 5 SC, İNC, 3 SC = 10 SC
5 p: (3 SC, İNC, 1 SC) * 2 = 12 SC
6 p: İNC, 11 SC = 13 SC
7 p: 7 SC, İNC, 5 SC = 14 SC
8 p: (4 SC, İNC, 2 SC) * 2 = 16 SC
We make SL-ST, fold the ear in half and tie it SC on the sides, right along the canvas (piercing it through), sticking the hook into the holes closest to the edge. It is important to ensure that the eyelet is folded flat and does not slide out when tying.
At the end we make SC and SL-ST in one place, cut the thread, leaving the end for sewing, fasten.
Sew on the ears on the sides, at a distance of 5 rows from the crown. Sew on, slightly bending, for each side separately. You will have to try on, especially the second eyelet, almost after every stitch.
Tail (gray):
1 p: 6 SC in the amigurumi ring
2 p: (2 SC, İNC) * 2 = 8 SC
3 p: (İNC, 3 SC) * 2 = 10 SC
4 p: (3 SC, İNC, 1 SC) * 2 = 12 SC
5 p: (İNC, 5 SC) * 2 = 14 SC
6 p: 14 SC
7 p: (4 SC, İNC, 2 SC) * 2 = 16 SC
8-12 RR: 16 SC
13 p: (UB, 5 SC) * 2 = 14 SC
14-15 RR: 14 SC
16 p: (3 SC, DEC, 2 SC) * 2 = 12 SC
17-18 RR: 12 SC
19 p: (DEC, 4 SC) * 2 = 10 SC
20-21 pp: 10 SC
We make SL-ST, cut the thread, leaving the end for sewing, fasten. Lightly stuff the tail, sew on the lower back.
Give the toys the desired pose. The wolf came out a little more, you can slouch him a little. We bend our arms and legs gradually, kneading the filler inside so that there are no ugly folds.
THE DOG AND THE WOLF ARE READY!