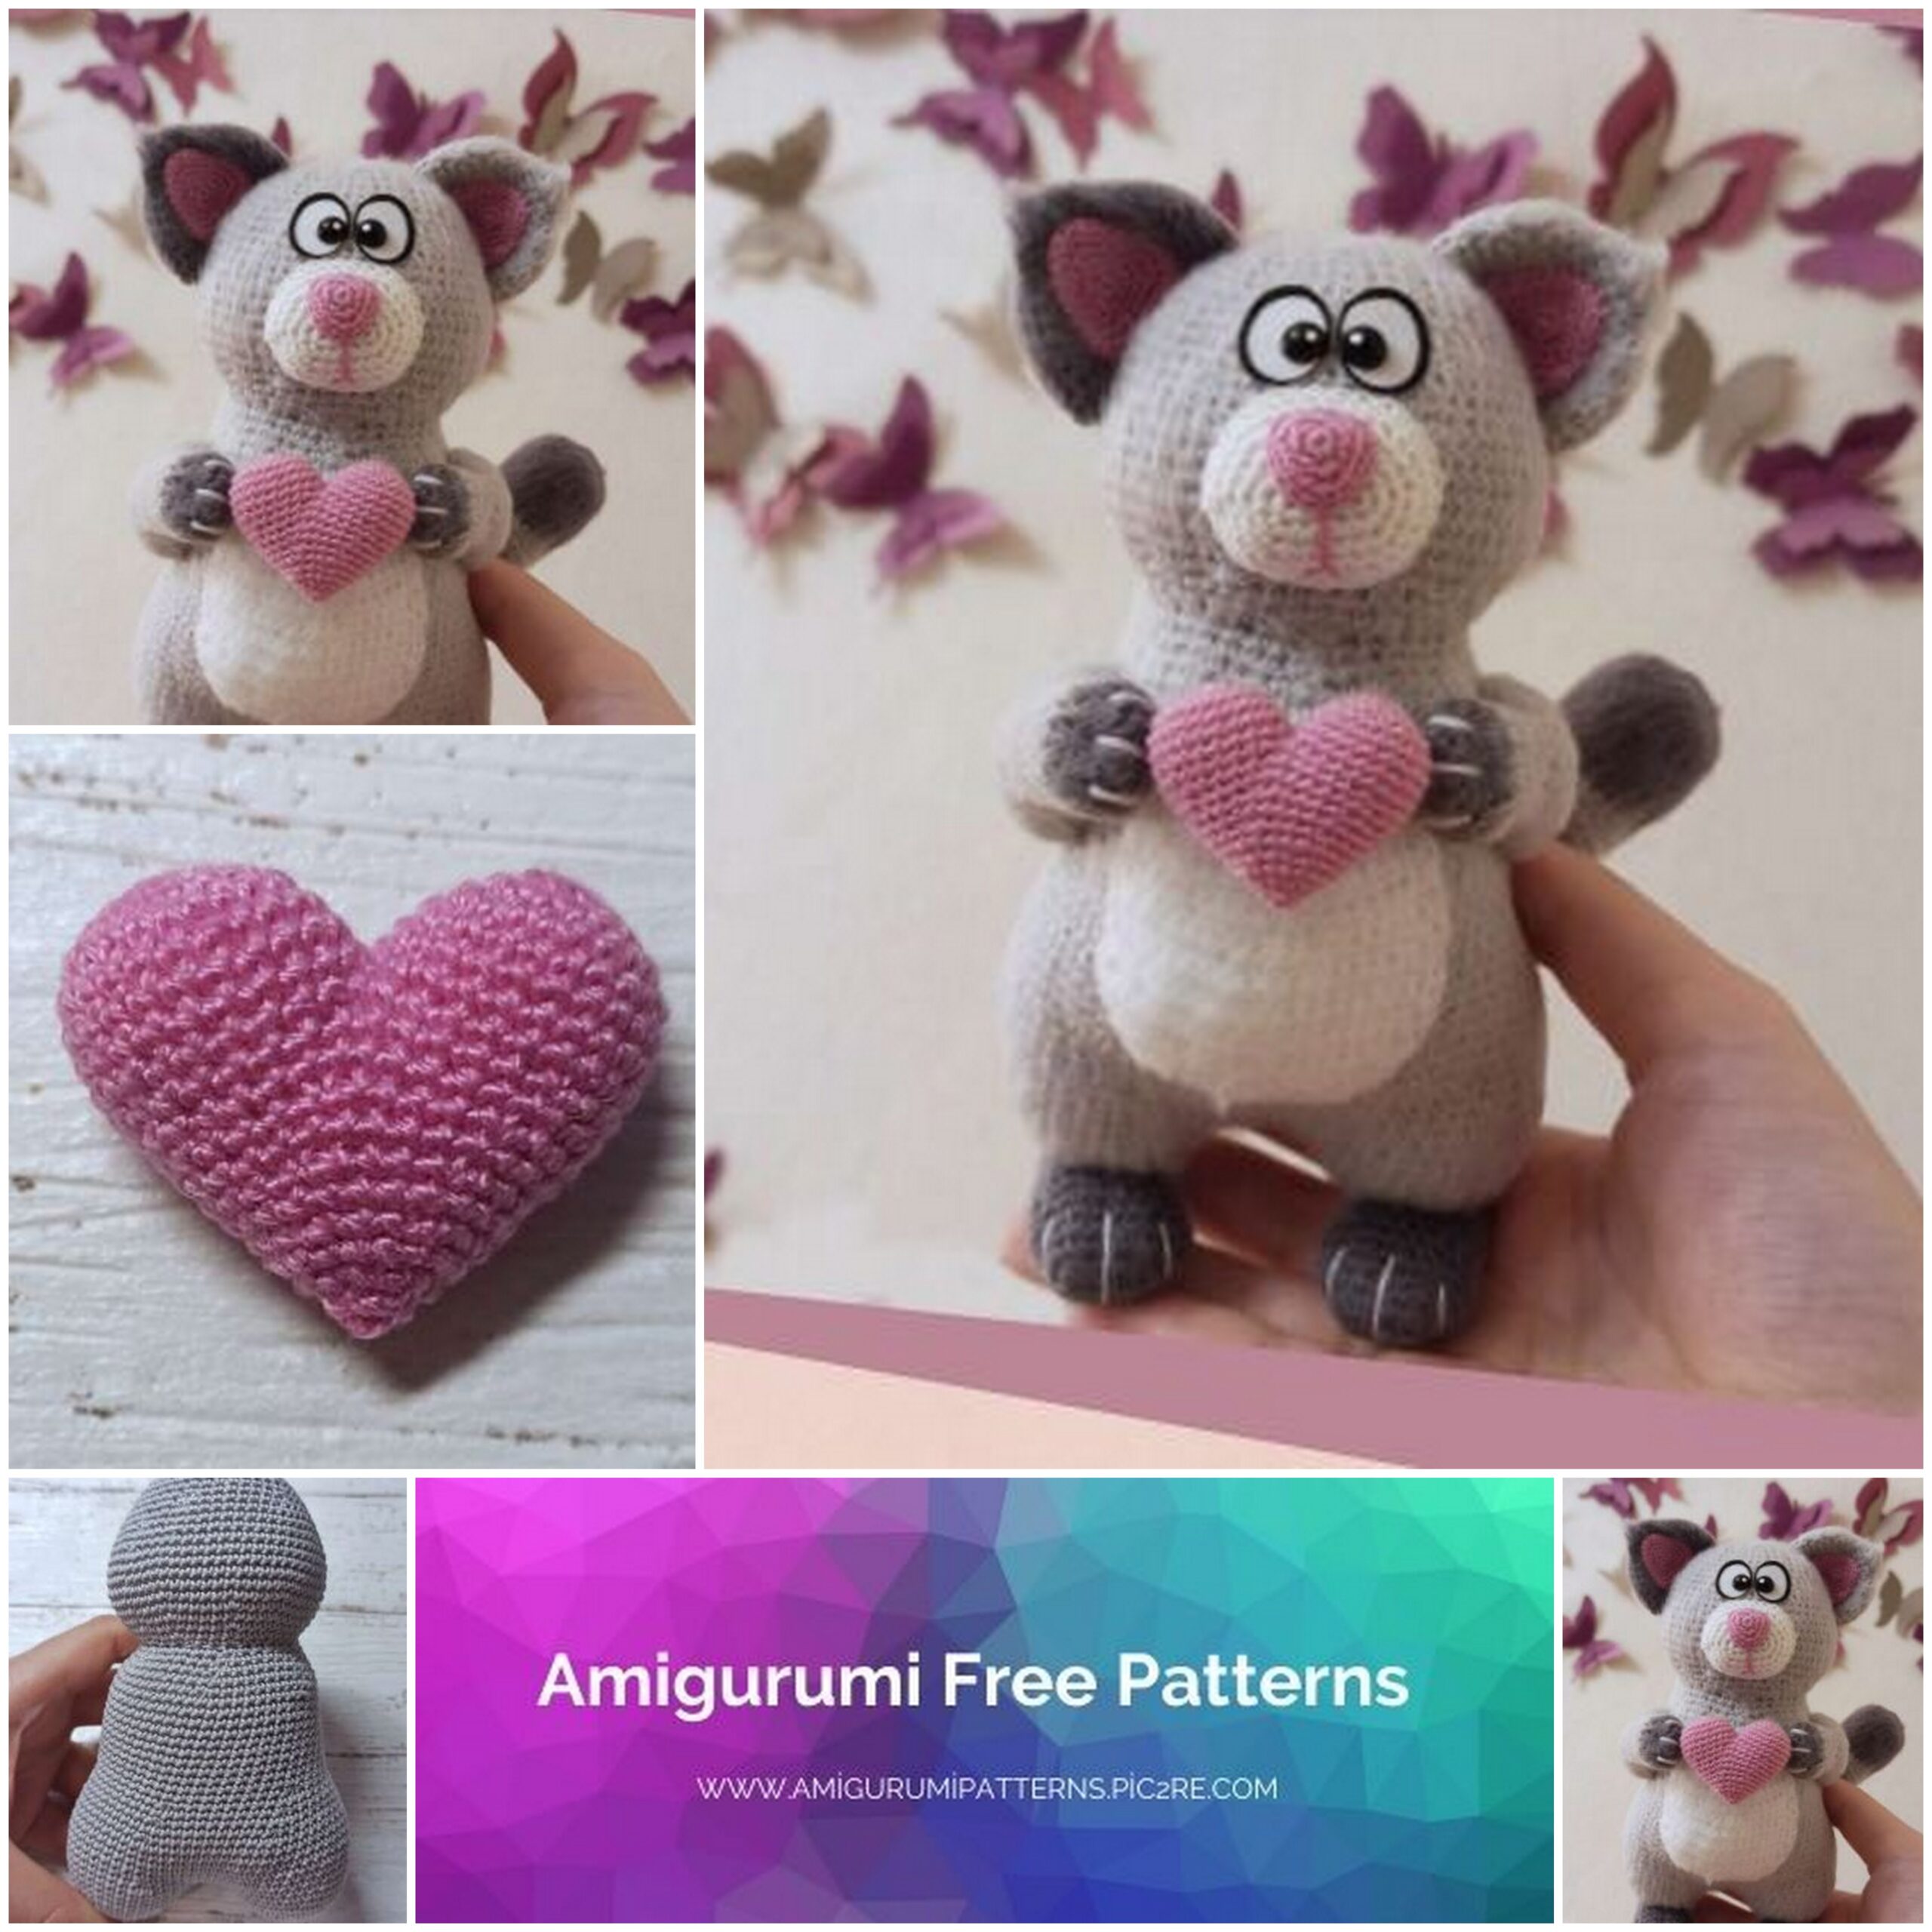
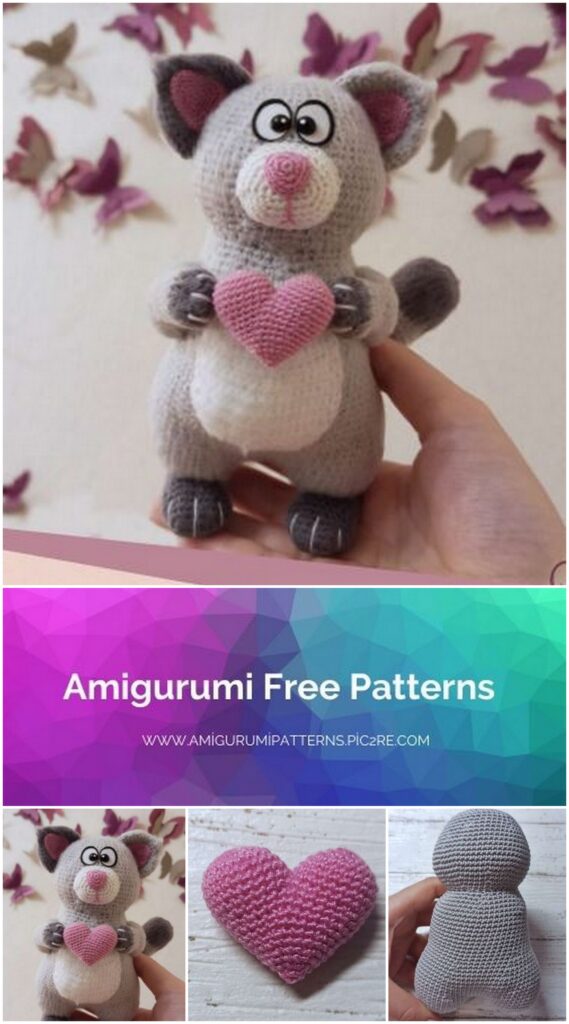
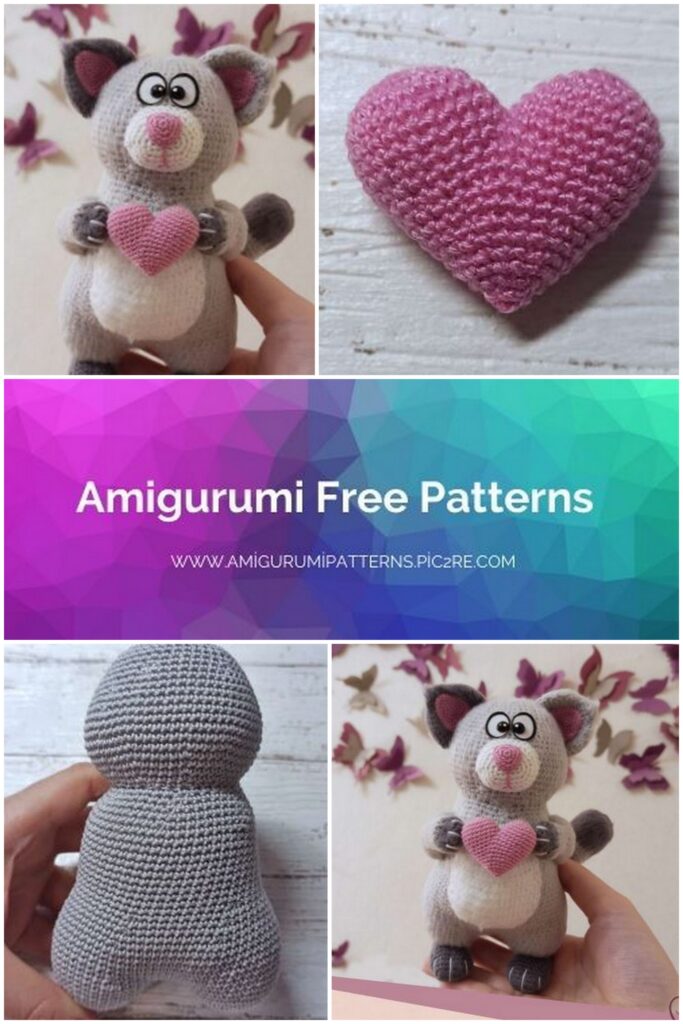
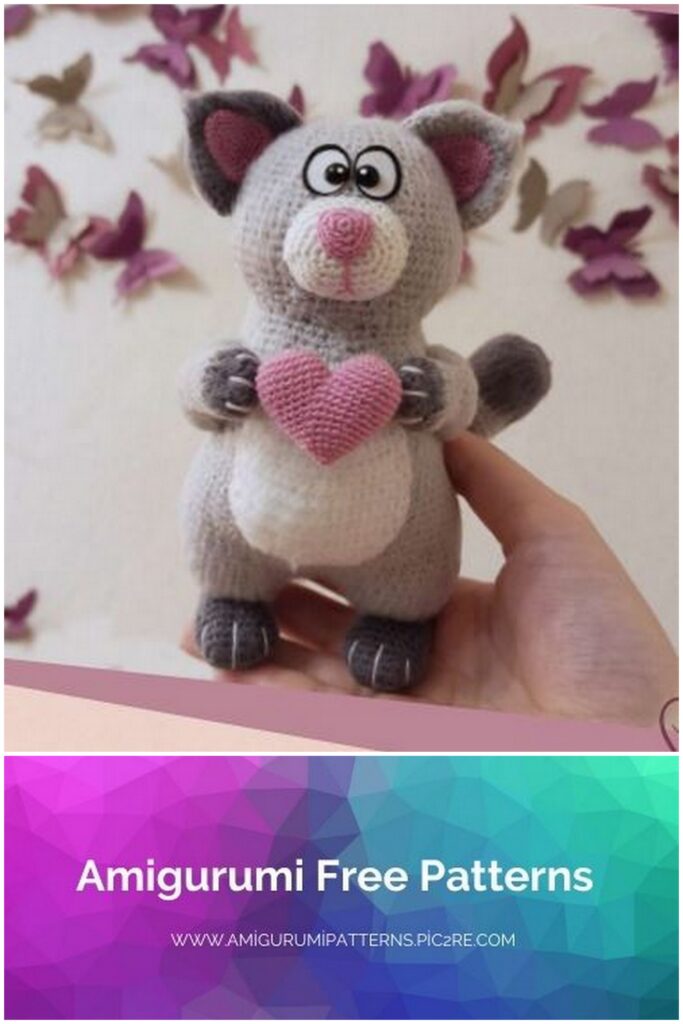
Amigurumi Cat with heart Free Pattern
Pinterest Offical Page : amigurumipatterns.pic2re.com
Facebook Group: amigurumipatterns.pic2re.com
Facebook Offical Page: amigurumipatterns.pic2re.com
Cat with heart
To give the effect of fluffy wool, the toy must be combed. This can be done with an animal comb or Velcro for clothes.
If you have not previously used such a technique when knitting, I recommend that you watch the video lesson (the link will be further in the diagram).
For knitting you need
1. Fine yarn (4 colors):
100% cotton yarn “Pekhorka Openwork” (50 g / 280 m), colors:
• (Gray, number 008) – the main color of the toy;
• (Dark gray, number 393) – additional color;
• (White, number 001) – muzzle, belly;
100% cotton yarn “Gamma” (10g / 82m), color:
• (Pink, number 0402) – nose, ears, heart.
2. Hooks (1 mm for the pink thread, 2 mm for the rest);
3. Filler;
4. Black flat eyes 6mm + glue;
5. White eye material + black and white paint (for decoration);
6. Scissors, a needle (preferably long), pins.
7. Tool for combing toys.
Before you start knitting, please read the information below.
Legend
CH – air loop;
SC – single crochet;
İNC – increase;
DEC – decrease;
(…) x6 – number of repetitions of values in brackets.
We start with the legs.
1.6 İNTO MAGİC RİNG
2.6 İNC (12)
3. (1 SC, 1 İNC) x6 (18)
4.1 SC, 1 İNC, (2 SC, 1 İNC) х5, 1 SC (24)
5.24 SC
6. (3 SC, 1 İNC) x6 (30)
7. (9 SC, 1 İNC) х3 (33)
We fasten and cut the thread on the first leg.
We knit the second leg in the same way, but do not cut the thread at the end of the seventh row.
Now let’s start knitting our toy!
Body and head
(thread gray)
8.1 SC, 3 CH, without removing the loop, insert the hook into any loop first
legs and knit: 33 SC on first leg, 3 SC on air loops, 32 SC on second leg (72)
24-33. 54 SC
34.16 SC, 1 İNC, (4 SC, 1 İNC) х2, 16 SC, 1 İNC, (4 SC, 1 İNC) х2 (60)
35. 60 SC
36. (8 SC, 1 DEC) x6 (54)
37.54 SC
38. (7 SC, 1 DEC) x6 (48)
39. (6 SC, 1 DEC) x6 (42)
40. (5 SC, 1 DEC) x6 (36)
41. For the front wall of the hinge: (5 SC, 1 İNC) x6 (42)
We also make additions for the front wall.
42. For both walls of the loop: 3 SC, 1 İNC, (6 SC, 1 İNC) x5, 3 SC (48)
9-12. 72 SC
13. (10 SC, 1 DEC) x6 (66)
14.66 SC
15.28 SC, 1 İNC, (7 SC, 1 İNC) х2, 21 SC (69)
16.30 SC, 1 İNC, (6 SC, 1 İNC) х2, 24 SC (72)
17.18. 72 SC
19. (10 SC, 1 DEC) x6 (66)
20.66 SC
21. (9 SC, 1 DEC) x6 (60)
22. 60 SC
23. (8 SC, 1 DEC) x6 (54)
Gradually stuff the toy as we knit.
43. (7 SC, 1 İNC) x6 (54)
44.4 SC, 1 İNC, (8 SC, 1 İNC) х5, 4 SC (60)
45. (9 SC, 1 İNC) x6 (66)
46.5 SC, 1 İNC, (10 SC, 1 İNC) х5, 5 SC (72)
47.72 SC
48.22 SC, 1 DEC, (5 SC, 1 DEC) х2, 18 SC, 1 DEC, (5 SC, 1 DEC) х2 (66)
49, 50.66 SC
51.21 SC, 1 DEC, (4 SC, 1 DEC) х2, 17 SC, 1 DEC, (4 SC, 1 DEC) х2 (60)
52. 60 SC
53.20 SC, 1 DEC, (3 SC, 1 DEC) х2, 16 SC, 1 DEC, (3 SC, 1 DEC) х2 (54)
54.54 SC
55. (7 SC, 1 DEC) x6 (48)
56. (6 SC, 1 DEC) x6 (42)
57-59. 42 SC
60. (5 SC, 1 DEC) x6 (36)
61. (4 SC, 1 DEC) x6 (30)
62. (3 SC, 1 DEC) x6 (24)
63. (2 SC, 1 DEC) x6 (18)
64. (1 SC, 1 DEC) x6 (12)
65.6 DEC
Secure and cut the thread.
Comb the detail.
You can watch how to comb a knitted toy in this video
1. We collect a chain of 6 CH
Start from the second stitch from the hook: 4 SC, 3 SC into the last stitch.
Continue on the other side of the chain: 3 SC, 2 SC into the last loop (12)
2.1 İNC, 3 SC, 3 İNC, 3 SC, 2 İNC (18)
3.1 SC, 1 İNC, 3 SC, (1 SC, 1 İNC) х3, 3 SC, (1 SC, 1 İNC) х2 (24)
4.2 SC, 1 İNC, 3 SC, (2 SC, 1 İNC) х3, 3 SC, (2 SC, 1 İNC) х2 (30)
5.30 SC
6.30 SC
Secure and cut the thread.
Muzzle
(white thread)
1.6 İNTO MAGİC RİNG
2.6 İNC (12)
3.4. 12 SC
5. (1 SC, 1 İNC) x6 (18)
6. (2 SC, 1 İNC) x6 (24)
7. (3 SC, 1 İNC) x6 (30)
8. (4 SC, 1 İNC) x6 (36)
9-11. 36 SC
12. (4 SC, 1 DEC) x6 (30)
Secure and cut the thread, leaving the sewing tip.
The second ear is knitted in the same way, with yarn of a different color.
Comb the details.
1.6 İNTO MAGİC RİNG
2.1 SC, 3 SC in one loop, 1 SC, 3 SC in one loop, 1 SC, 3 SC in one loop (12)
3.2 SC, 3 SC one loop, 3 SC, 3 SC one loop, 3 SC, 3 SC one loop, 1 SC (18)
4.3 SC, 3 SC in one loop, 5 SC, 3 SC in one loop, 5 SC, 3 SC in one loop, 2 SC (24)
5.4 SC, 3 SC in one loop, 7 SC, 3 SC in one loop, 7 SC, 3 SC in one loop, 3 SC (30)
Secure and cut the thread, leaving the sewing tip.
The second part is knitted in the same way.
Nose
(pink color, hook 1 mm)
1.6 İNTO MAGİC RİNG
2.1 SC, 3 SC in one loop, 1 SC, 3 SC in one loop, 1 SC, 3 SC in one loop (12)
3.2 SC, 3 SC one loop, 3 SC, 3 SC one loop, 3 SC, 3 SC one loop, 1 SC (18)
4.18 SC
Secure and cut the thread.
Ears, outside. 2 details
(dark gray and gray)
Ears, inner part. 2 details
(pink color, hook 1 mm)
1. We collect a chain of 6 CH
Start from the second stitch from the hook: 4 SC, 3 SC into the last stitch.
Continue on the other side of the chain: 3 SC, 2 SC into the last loop (12)
2.1 İNC, 3 SC, 3 İNC, 3 SC, 2 İNC (18)
3.1 İNC, 6 SC, 1 İNC, 1 SC, 1 İNC, 6 SC, 1 İNC, 1 SC (22)
4-6. 22 SC
7.10 SC, 1 DEC, 8 SC, 1 DEC (20)
8-12. 20 SC
13.1 DEC, 9 SC, 1 DEC, 7 SC (18)
14.18 SC
Stuff tightly with filler.
15. (1 SC, 1 DEC) x6 (12)
16.6 DEC
Secure and cut the thread, leaving the sewing tip.
Tie the other foot in the same way.
Comb the details.
We start with a dark gray thread.
1. We collect a chain of 4 CH
Start from the second stitch from the hook: 2 SC, 3 SC into the last loop.
Continue on the other side of the chain: 1 SC, 2 SC into the last loop (8)
2.1 İNC, 2 SC, 2 İNC, 2 SC, 1 İNC (12)
3.1 İNC, 4 SC, 2 İNC, 4 SC, 1 İNC (16)
4.5. 16 SC
Change the thread to gray and continue knitting:
6.7. 16 SC
8. (2 SC, 1 DEC) x4 (12)
Gradually fill the part with filler.
9.12 SC
10. (5 SC, 1 İNC) x2 (14)
Feet. 2 details
(dark gray)
Hands. 2 details
(dark gray and gray)
Row 7
11.14 SC
12. (6 SC, 1 İNC) x2 (16)
13.16 SC
14. (7 SC, 1 İNC) x2 (18)
15.18 SC
16. (8 SC, 1 İNC) x2 (20)
17. (4 SC, 1 İNC) x4 (24)
18-20. 24 SC
21. (2 SC, 1 DEC) x6 (18)
Cut and pull the thread, leaving about 40 centimeters to sew the edge of the piece and sew the arm to the body. Pack the part tightly with filler.
Fold the edge of the part in half, the connection line should be parallel to the chain of air loops of the first row. Using a needle, bring the thread to the beginning of the line and sew the edges.
By analogy, knit the other hand and comb both parts.
Knitting takes place in rotary rows
1. We collect a chain of 11 CH. From the second loop from the hook we knit 10 SC, CH, turn over the knitting (10)
2.1 İNC, 8 SC, 1 İNC, CH, turn (12)
3.1 İNC, 10 SC, 1 İNC, CH, turn (14)
4.1 İNC, 12 SC, 1 İNC, CH, turn (16)
5.1 İNC, 14 SC, 1 İNC, CH, turn (18)
Stomach
(White color)
6-12. 18 SC, CH, turn (18)
13.8 SC, 1 DEC, 8 SC, CH, turn (17)
14.17 SC, CH, turn (17)
15.7 SC, 1 DEC, 8 SC, CH, turn (16)
16.16 SC, CH, turn (16)
17.4 SC, 1 DEC, 4 SC, 1 DEC, 4 SC, CH, turn (14)
18.14 SC, CH, turn (14)
19.3 SC, 1 DEC, 4 SC, 1 DEC, 3 SC, CH, turn (12)
20.12 SC, CH, turn (12)
21.3 SC, 1 DEC, 2 SC, 1 DEC, 3 SC, CH, turn (10)
22, 23.10 SC (10)
Without cutting the thread, we tie the piece in a circle with single crochets. At the top of the detail, make one decrease in the center (see photo 3).
How to tie a piece in a circle can be seen here. Secure and cut the thread. Comb the detail on one side.
Tail
(dark gray and gray)
We start with a dark gray thread
1.6 İNTO MAGİC RİNG
2.6 İNC (12)
3. (1 SC, 1 İNC) x6 (18)
4.1 SC, 1 İNC, (2 SC, 1 İNC) х5, 1 SC (24)
5-12. 24 SC
Switch to the gray thread and continue:
13-15. 24 SC
16. (6 SC, 1 DEC) x3 (21)
17.21 SC
Switch to a dark gray thread and continue:
18-20. 21 SC
21. (5 SC, 1 DEC) x3 (18)
22-26. 18 SC
Switch to the gray thread and continue:
27-35. 18 SC
36. (1 SC, 1 DEC) x6 (12)
Cut off the thread, leaving 30 centimeters. Fold the remaining hole in half and sew with a needle.
Comb the detail.
1.6 İNTO MAGİC RİNG
2.6 İNC (12)
3. (1 SC, 1 İNC) x6 (18)
4.1 SC, 1 İNC, (2 SC, 1 İNC) х5, 1 SC (24)
5-7. 24 SC
Secure and cut the thread.
We knit another exactly the same part, at the end of knitting we do not cut the thread.
We set the marker for the beginning of the row and start knitting the eighth row.
8. For the second part 20 SC. (if you have connected the parts correctly, then by knitting 20 SC you will find yourself at the loop from which the connection of the two parts began). Next, make a decrease by tying together the first two loops, from which the connection of the parts began. Then work 20 SC on the first piece, and again make a decrease by knitting the last two stitches together, which ended the connection of the two pieces.
In the eighth row, 42 loops should be obtained (20 loops on each part (we do not count 4 common pillars ka) + 2 loops, obtained in places where the reductions were made).
A heart
(pink color, hook 1 mm)
Next, we connect the two parts. For this:
1. Remove the hook from the loop of the second part and insert it into any loop of the first part from the inside out.
2. Insert the hook into the loop of the second piece and pull this loop into the first piece, making an air loop.
3. Work 3 single crochets through both pieces.
There are 4 common columns (counting the air loop).
Knit 2 stitches together (dec)
9. (5 SC, 1 DEC) x6 (36)
10.36 SC
11. (4 SC, 1 DEC) x6 (30)
12.30 SC
13. (3 SC, 1 DEC) x6 (24)
14.24 SC
Gradually fill with filler
15. (2 SC, 1 DEC) x6 (18)
16.18 SC
17. (1 SC, 1 DEC) x6 (12)
18.6 DEC
Finish knitting, secure and cut the thread.
First you need to make tightening (recesses) in the places where the hands will be located. To do this, use pins to mark the attachment points of the arms on the sides of the body (my upper pin is located between 7 and 8 rows, the lower one is between 12 and 13 rows (counting from the neck) Cut 50 centimeters of gray thread and insert into the longest needle (I use a pink thread for clarity).
Step 1: Insert the needle where the lower right pin (in the photo is green), and pull in where the lower left pin (purple). Pull the thread through the toy, leaving the tip 20 centimeters on the right side.
Step 2: Insert the needle under the top left pin (red) and pull out on the opposite side under the top right pin (yellow).
Step 3: Gently pull both threads to the right – a depression will appear on the left. Tie the two ends of the thread near the body with 2 strong knots to secure the groove.
Caution: Do not pull too hard – the yarn may break.
Step 4: Pass both ends of the thread one at a time to the opposite side. In the same way, gently pull the ends of the thread to make the same indentation on the right. Tie 2 strong knots, lock and cut the thread.
The braces are needed so that the arms fit snugly against the body, so do not make them too deep.
All the parts are ready and we are moving on to the assembly stage!
Important: All parts must be combed before assembly.
STAGE I: Body
deepening
for hand
Position the muzzle relative to the center of the head, 3-4 rows back from the neck. Pin, sew on 3/4 of the pieces, remove all pins, add filler and sew on the rest.
Sew on the nose on the top of the muzzle and add some filler to make the nose more voluminous. After the nose has been sewn on, sew a few stitches below to form the mouth.
Use white thread to sew small stitches at the ends of the arms and tighten them slightly.
Sew your arms on the sides of the body at the stretch marks. If necessary, secure your hands to the abdomen with a few stitches.
Also sew stitches on the feet with white thread and sew them to the feet.
Sew on the tail at the end.
Sew on pink triangles in the center of the ears.
Sew the ears to the head.
We cut out the main part of the eyes from scrap materials (I used non-woven napkins for manicure, but any material that does not deform when glue is applied and keeps its shape, such as felt, is suitable. You can also knit an oval or use ready-made eyes).
Draw the border of the eye with black paint, after completely dry, glue the pupil (I used Moment glue), draw small dots on the pupil with white paint.
Glue the eyes to the toy (I also attached to the Moment).
The abdomen is located on the side where the more convex part of the body is.
Center the white piece, pin and sew on three of the four sides. Add some filler through the remaining hole and sew on the remaining side.
Our toy is ready!