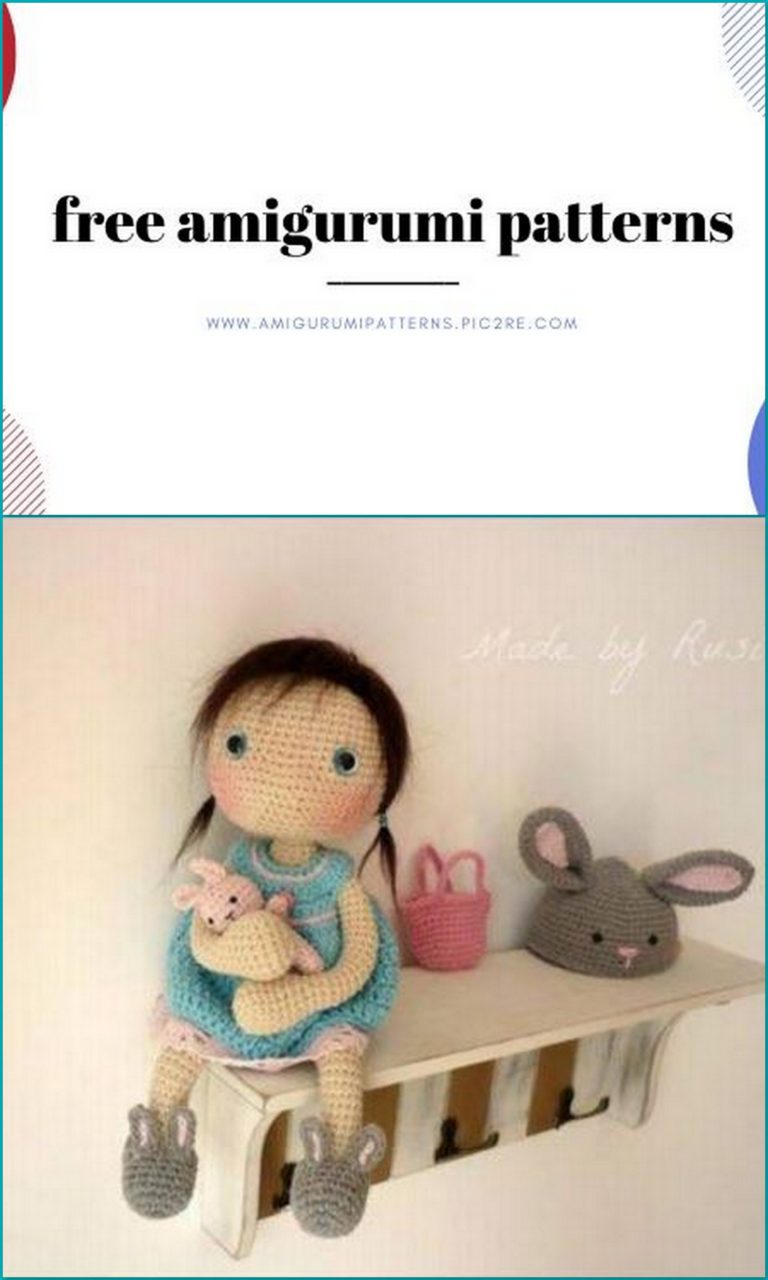
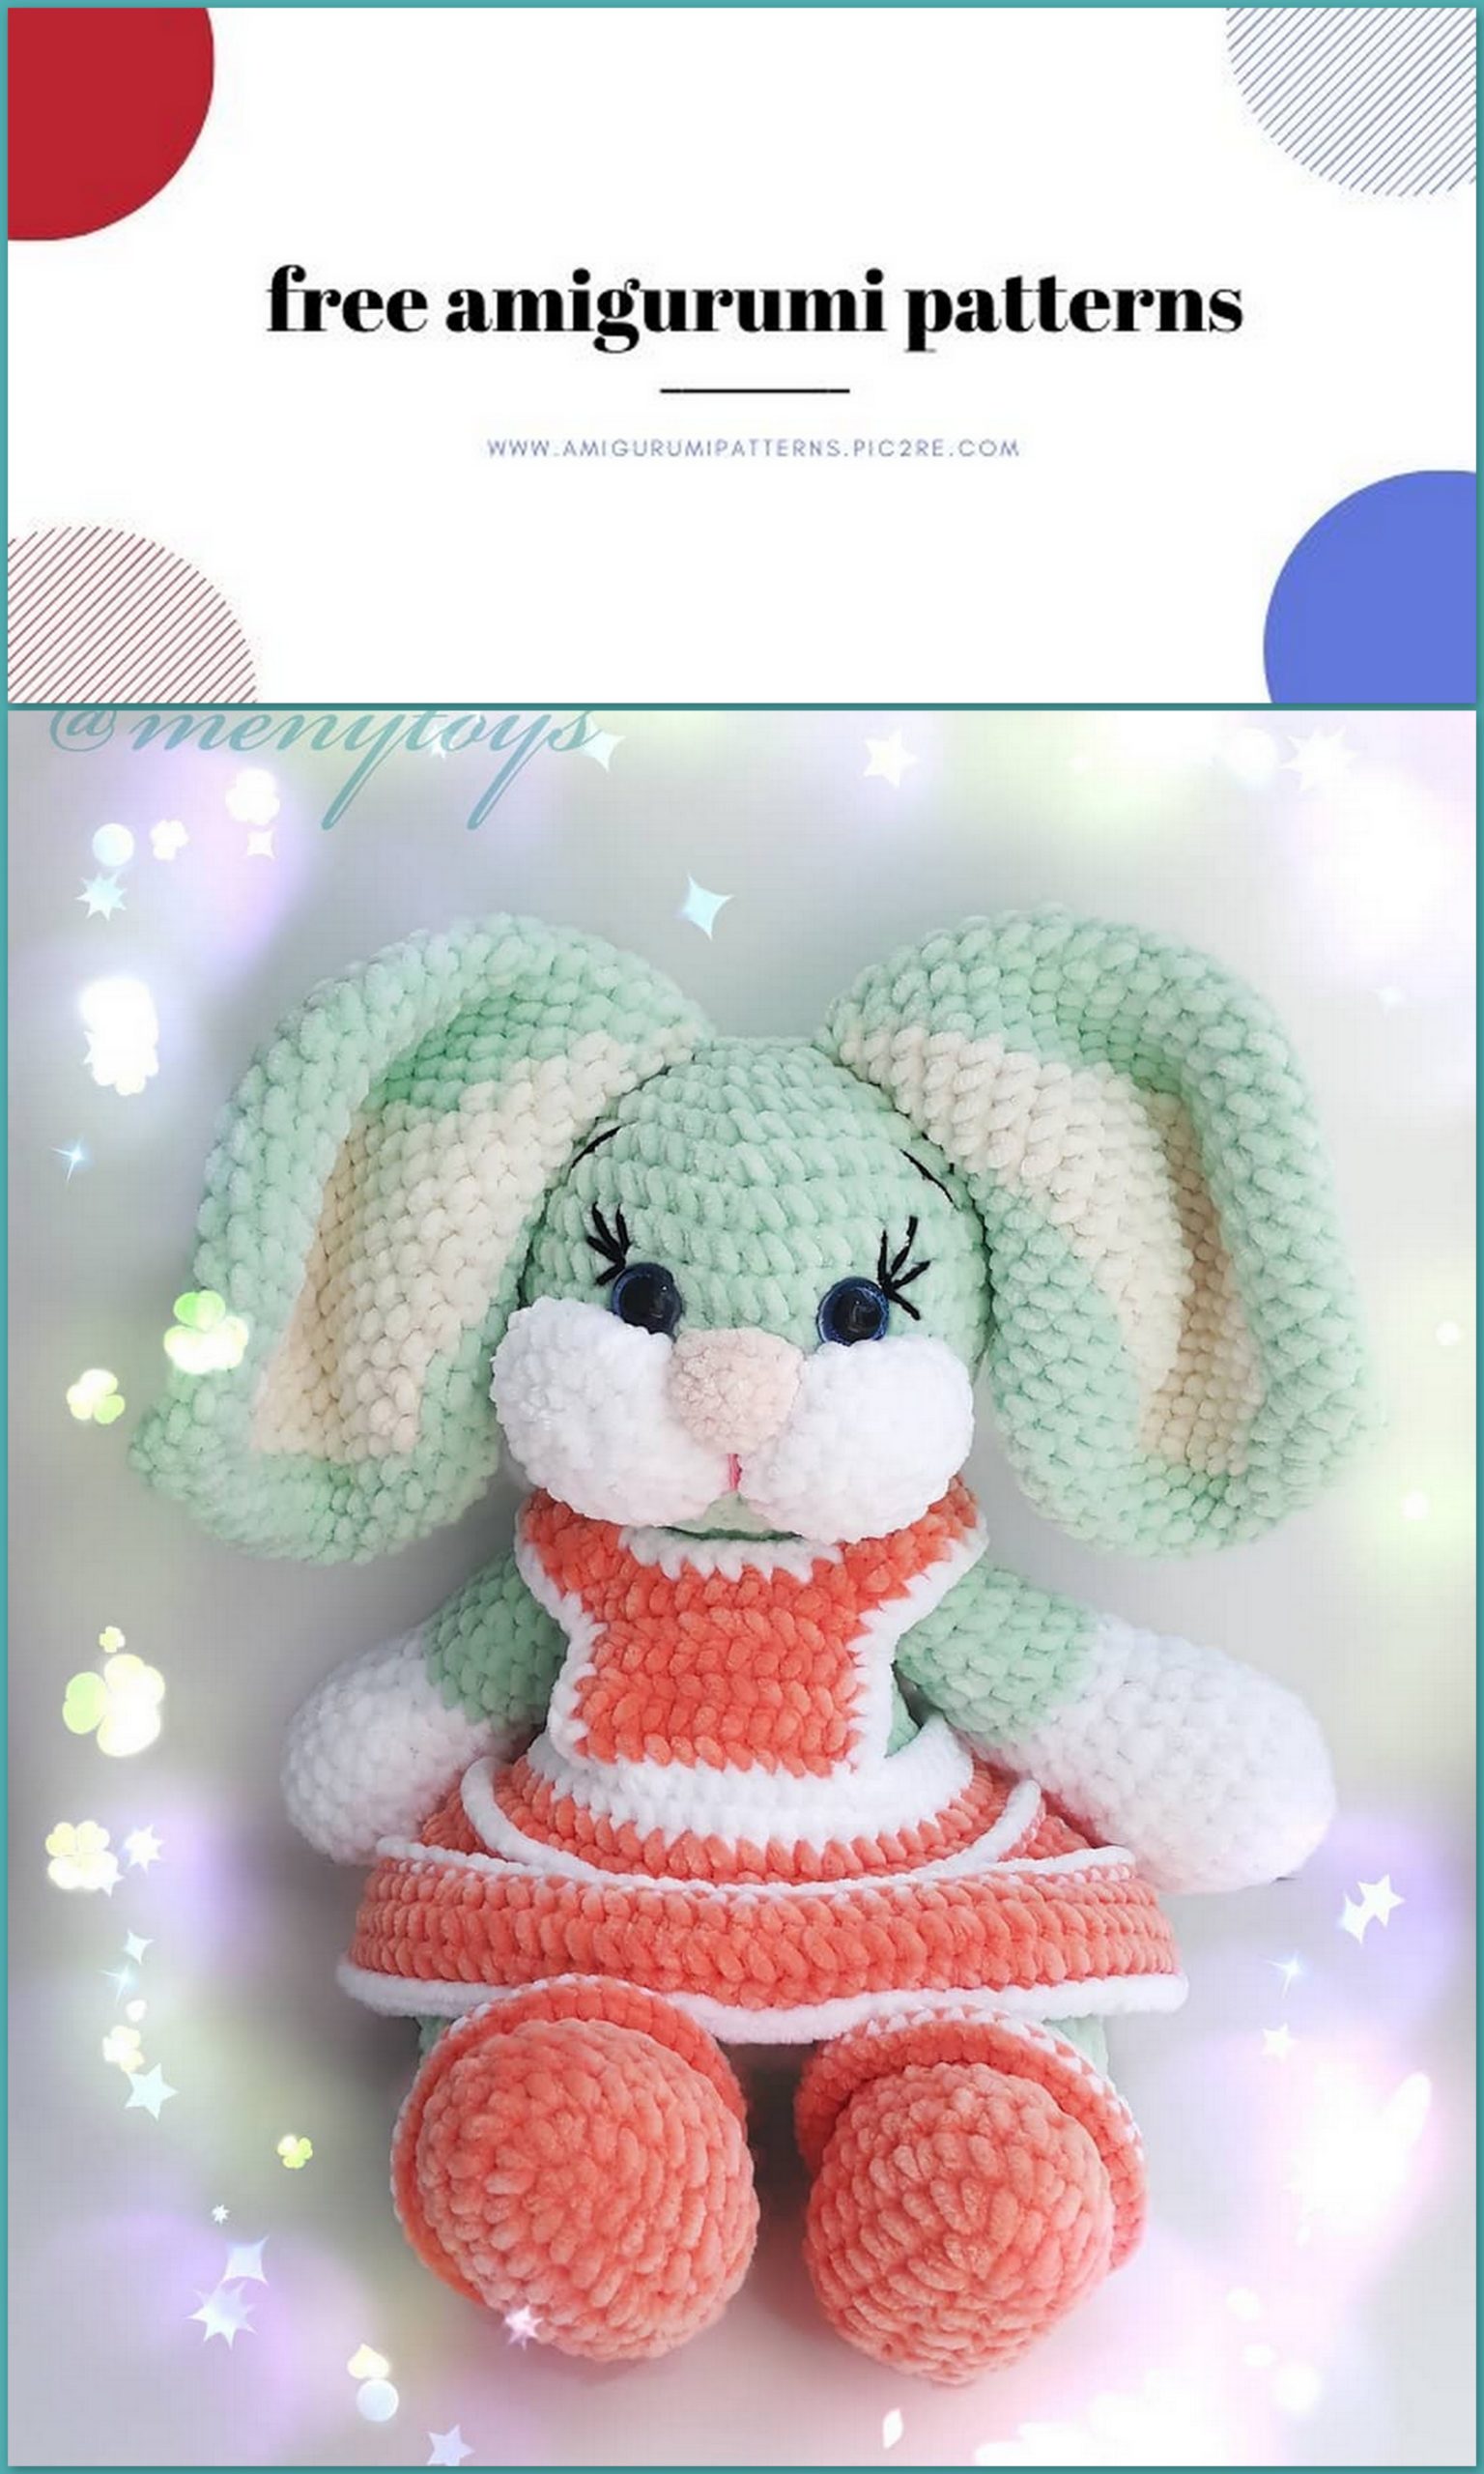
Amigurumi Velvet Bunny Ollie Free Crochet Pattern
Pinterest Offical Page : amigurumipatterns.pic2re.com
Facebook Group: amigurumipatterns.pic2re.com
Facebook Offical Page: amigurumipatterns.pic2re.com
This is a very cute amigurumi pattern that you will knit with velvet rope. You can find the toys you can knit with Amigurumi velvet on our website.
Posted by: Maria Sharova
Legend:
sc – single crochet;
ps – half-column;
ch is the air loop;
inc – increase;
dec – decrease;
(…) x6 – repeat the action in
brackets 6 times
Necessary materials:
1) 2 hanks of Himalaya dolphin baby (primary color);
2) 1 hatch Himalaya dolphin baby (color of dress and shoes);
3) 2/3 hank Himalaya dolphin baby (harness and muzzle, ears);
4) Quite a bit Himalaya dolphin fine (on the nose);
5) Black thread for embroidery cilia and eyebrows and pink for the mouth;
6) Simple white thread for stitching parts / joints;
7) Hook 4,5mm;
8) Eyes 20mm;
9) Filler.
The growth of a hare excluding ears is about 40 cm. With ears about 60 cm
Legs:
1 row) 6ch (6)
2 row) (left row) 1 inc 4sc 1pr
(Row right) 2 inc 4sc 1 inc (18)
3rd row) (left row) 1 inc 5sc 1 inc
(Row right) 2inc 5sc 1 inc 2sc (24)
4 row) 1inc 9sc 1inc 11sc 1inc (26)
5 row) 26sc (26)
6 row) 11sc 2dec 11sc (24)
7 row) 10sc 2dec 10sc (22)
8 row) 8sc 1dec 2sc 1dec 8sc (20)
9 row) 20sc (20)

We start to knit lace.
We knit for 20sc facial loops around the legs.
1 row) 20sc (20)
2 row) 20inc (40)
3 row) 40sc.
You can tie 40sc with another thread, for the front loops (on the toy it is made with white thread). We continue to knit the leg for the back 20sc with the main color of your toy.
10-12 row) 20sc (20)
13 row) (1dec 3sc) × 4 (16)
14-17) 16sc (16)
If the legs on the joints, the option of knitting the left leg is described below.
We knit the right one according to the same pattern, only vice versa i.e. 18-21 row we read
from right to left.
18 row) 3sc 1dec 11sc (15)
19 row) 2sc 2dec 9sc (13)
20 row) 2sc 2dec 7sc (11)
21 row) 4sc 7 half-columns (11)
We insert the joint, tighten 11 loops.
Leg option without using a joint:
18-21 row) (1dec 2sc) × 4 (12) Fold in half and knit 6sc.
Torso:
1 row) Amigurumi ring 6sc (6)
2 row) 6inc (12)
3 row) (1inc 1sc) × 6 (18)
4 row) (1inc 2sc) × 6 (24)
5 row) (1inc 3sc) × 6 (30)
6 row) (1inc 4sc) × 6 (36)
7 row) (1inc 5sc) × 6 (42)
8-11 row) 42sc (42)
12 row) (5sc 1dec) × 6 (36)
13 row) 36sc (36)
14 row) (4sc 1dec) × 6 (30)
15 row) 30sc (30)
16 row) (3sc 1dec) × 6 (24)
17 row) 24sc (24)
18 row) (2sc 1dec) × 6 (18)
19-22 row) 18sc (18)
We fill with filler in the course of knitting.
Pens:
1 row) Amigurumi ring (white) 6sc (6)
2 row) 6inc (12)
3 row) (1inc 1sc) × 6 (18)
4 row) (1inc 2sc) × 6 (24)
5-8 row) 24sc (24)
9 row) (1dec 1sc) × 3 15sc (21)
10 row) 1sc 2dec 16sc (19)
11 row) 1sc 1dec 16sc (18)
Transition to the main color.
12-14 row) 18sc (18)
15 row) (4sc 1dec) × 3 (15)
16 row) 15sc (15)
17 row) (3sc 1dec) × 3 (12)
Then we knit under the joint (right handle):
18 row) 2dec 6sc 1dec (9)
(Left knob):
18 row) 3sc 3dec 3sc (9)
If knobs without joints, then we knit:
18 row) (2sc 1dec) × 3 (9)
19 row) 9sc (9)
Head:
1 row) Amigurumi ring 6sc (6)
2 row) 6inc (12)
3 row) (1inc 1sc) × 6 (18)
4 row) (1inc 2sc) × 6 (24)
5 row) (1inc 3sc) × 6 (30)
6 row) (1inc 4sc) × 6 (36)
7 row) (1inc 5sc) × 6 (42)
8 row) (1inc 6sc) × 6 (48)
9-13 row) 48sc (48)
14 row) (6sc 1dec) × 6 (42)
15 row) (5sc 1dec) × 6 (36)
16 row) (4sc 1dec) × 6 (30)
17 row) (3sc 1dec) × 6 (24)
18 row) (2sc 1dec) × 6 (18)
19 row) 18sc (18)

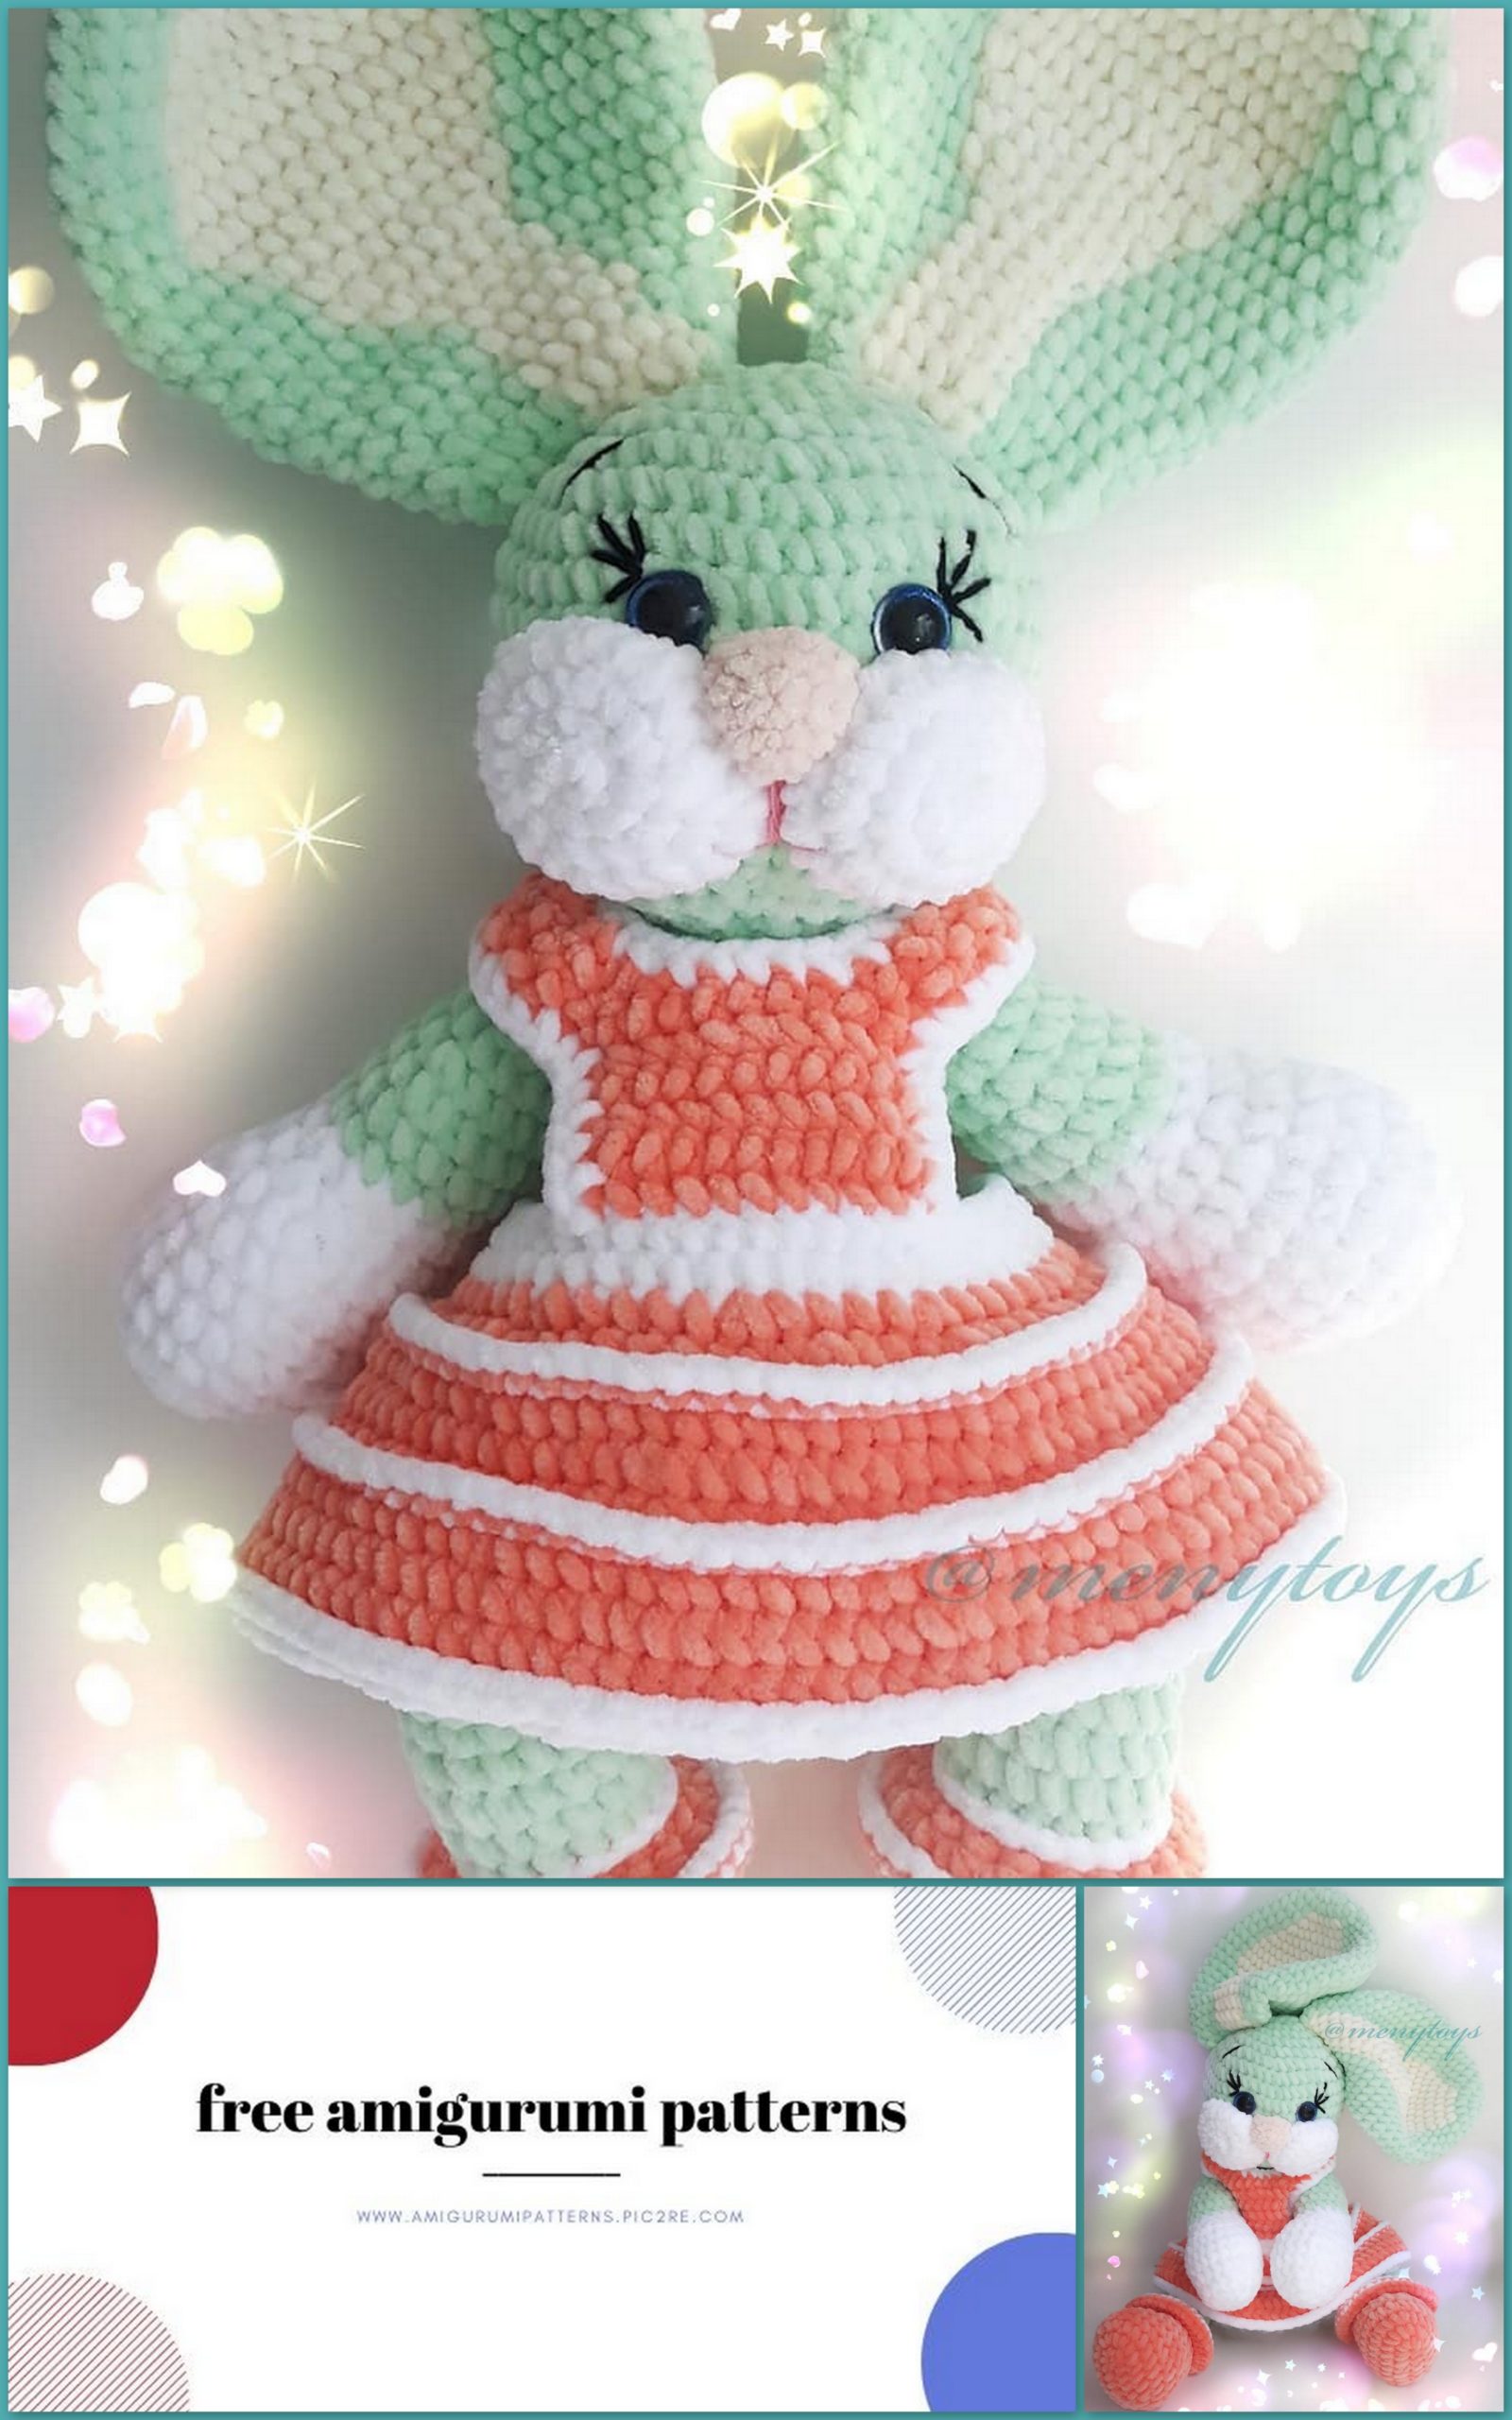
Cheeks:
1 row) Amigurumi ring 6sc (6)
2 row) 6inc (12)
3 row) (1inc 1sc) × 6 (18)
4 row) (1inc 2sc) × 6 (24)
5 row) 24sc (24)
6 row) 24sc (24)
Sew cheeks next to each other. Connect at about 3-4sc so that the nose can be sharpened down and embroider pink
a strip.
Spout:
1 row) Amigurumi ring 5sc (5)
2 row) 5inc (10)
3 row) (1sc inc) × 5 (15)
Cheeks and nose are not stuffed with filler.
Ears (left):
1 row) Amigurumi ring 6sc (6)
2 row) 6inc (12)
3 row) (1sc 1inc) × 6 (18)
4 row) (2sc 1inc) × 6 (24)
5 row) 1inc 3sc 1inc 5sc 1inc 2sc 1inc 5sc 1inc 3sc 1inc (30)
6 row) 1inc 5sc 1inc 5sc 1inc 4sc 1inc 5sc 1inc 5sc 1inc (36)
7 row) 1inc 5sc 1inc 7sc 1inc 6sc 1inc 7sc 1inc 5sc 1inc (42)
8 row) 1sc 1inc 6sc 1inc 7sc 1inc 8sc 1inc 7sc 1inc 6sc 1inc 1sc (48)
9 row) 2sc 1inc 7sc 1inc 7sc 1inc 10sc 1inc 9sc 1inc 7sc 1inc (54)
An offset of 2sc is allowed on this row. Bring a number. Snap
2sc.
10-13 row) 54sc (18sc 14sc 22sc) (54)
14 row) 1dec 7sc 1dec 7sc 1dec 10sc 1dec 9sc 1dec 9sc 1dec (48)
15 row) 48sc (16sc 12sc 20sc) (48)
16 row) 2dec 6sc 1dec 5sc 1dec 8sc 1dec 10sc 1dec 7sc (42)
17 row) 42sc (14sc 10sc 18sc) (42)
18 row) 3sc 1dec 3sc 1dec 4sc 1dec 8sc 1dec 5sc 1dec 5sc 1dec 4sc (36)
19 row) 36sc (12sc 8sc 16sc) (36)
20 row) 3sc 1dec 3sc 1dec 2sc 1dec 4sc 1dec 3sc 1dec 3sc 1dec 3sc 1dec
2sc (30)
21 row) 30sc (10sc 6sc 14sc) (30)
22 row) 4sc 1dec 2sc 1dec 6sc 1dec 5sc 1dec 5sc (26)
23 row) 26sc (8sc 6sc 12 sc) (26)
24 row) 2sc (1sc 1dec) × 2 6sc 1dec 2sc 1dec 1sc 1dec 4sc (22)
25 row) 22sc (6sc 6sc 10sc) (22)
Fold, snap 11sc. Knit the right ear in the same way, but from the 10th row we read the opposite. From right to left. Since when knitting in a circle, displacement of the loops is allowed, the pattern on the ears may shift. It is enough just to keep the middle, with the same number of stitches in a row.
Dress:
1 row) 50ch (1ch and 50ch connect) (50)
2-3 row) 50sc (50)
4 row) (4sc 1inc) × 10 (60)
5 row) (3sc 1inc) × 15 (75)
6 row) White, behind the front loops, 75sc (75)
6 row) For the reverse loops 75sc (75)
7-8 row) 75sc (75)
9 row) For front loops, white 75sc (75)
9 row) For the wrong loops (4sc 1inc) × 15 (90)
10-11) 90sc (90)
12 row) White, for front loops 90sc (90)
12 row) For the wrong loops, the same white color, 90sc (90)
Breast. Divide the waist of the skirt in half 50/25 / 12-13. We calculate 11sc in the middle. That is, 7/11/7 = 25 (half the waist).
1-5 row) 11sc (11) We do the turns by adding 1 ch. But we do not knit it in the subsequent rows. They are needed for convenient strapping.
Webbing (left and right). Height depends on knitting density. It is advisable to tie the joint to the body, put on a skirt and on the shoulders, from the edge of the breast estimate the height of the strap. I got 9 rows of 3sc. Width 3sc.
Tie the breast (see picture).
Back. Divide the remaining 25sc waist
in half. We calculate 9/7/9.
1-5 row) 7sc (7)
Webbing (left and right). 3sc width. We select the height, trying on. I got 7 rows. We tie the back. Sew / assemble all parts together. We sew / insert the legs into the joint so that the toy can sit (as the ears turn out to be voluminous and heavy). Dress up the dress. Sew / insert handles into the joint.
We make a face. Insert the eyes. Sew on the ears. We embroider the eyebrows and cilia. From the bottom edge of the spout we make a pink strip. Sew on the head. And at the end we tie the straps.
Your toy is ready !!!